How to Put a Sofa and Love Seat at a Long Room

The living room has all of the charm of a long scrawny hall, and you need to fit the sofa and love seat inside without making it appear to be a bus station. Parallel positioning will just emphasize the inauspicious dimensions of the room. Play accessories, upholstery and carpet colors, and surprising furniture groupings to create a gracious and balanced area.

End Point

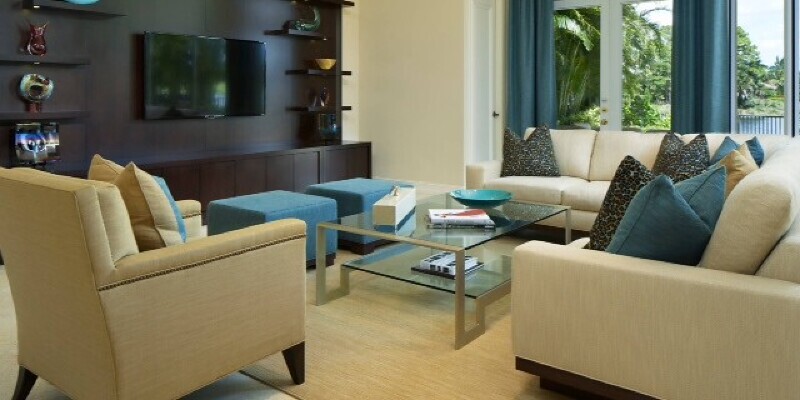
Arrange the sofa and love seat in a ideal angle against the back wall of a long narrow area, the love seat on the end wall and the sofa on the longer wall. Then give the love seat more heft using a wall system supporting it full of books and artwork. A single painting above the bigger sofa on the adjoining wall connects and balances the two seating therapies, but it’s less weighty than a complete wall of shelves, artwork and books. Tuck a table into the empty corner created in which the sofa and love seat meet and use a sculptural lamp on the table as both artwork and a light source.

Colorful Island

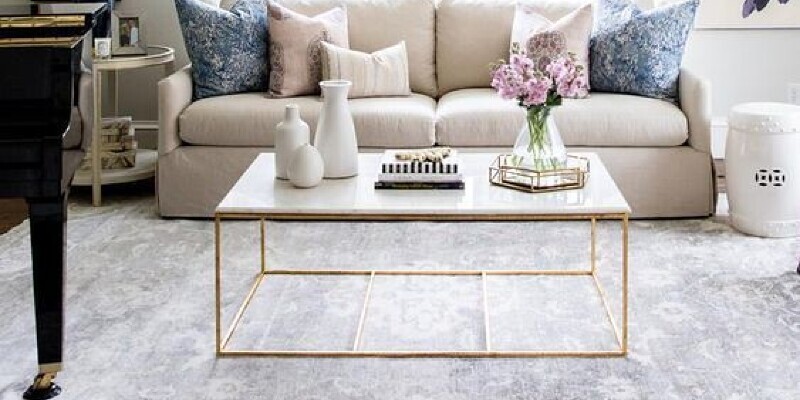
Color, carpet and scale focus attention on a conversation area with a sofa and love seat in a long, narrow living room. Upholster the couch and the love seat in contrasting but coordinated fabric, using two principal and one accent colors. A midnight-blue velvet sofa with blue-and-cream paisley throw cushions is represented by a cream like seat — maybe in unbleached linen — using a thin blue stripe running through it. The cushions on the love seat are orchid or pansy-purple using midnight-blue medallion designs. Anchor the group using a contemporary rug that picks up the blue, cream and purple colors and hang a large painting or framed weaving, primarily in hues of purple, above the sofa. A cream laminate coffee table, floor lamp with a curved base and a hanging cream lampshade, and blue-and-cream paisley drapes draw focus away from the awkward dimensions of the room.

Depth Perception

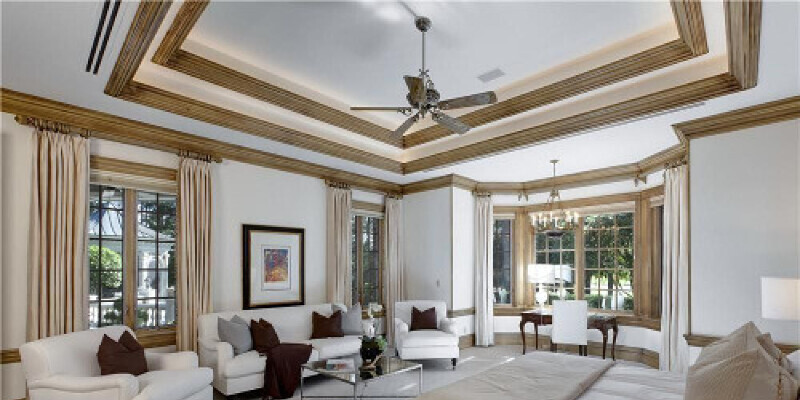
When the room has windows on the long walls, then it is possible to layer the room to fit the sofa and love seat into a harmonious uncrowded but streamlined arrangement. Place the sofa on one window wall using the love seat catty-corner for it, but not close the windowless wall. Place a tall storage cupboard, armoire or wall system against the short wall behind the love seat. Snug a sofa table precisely the same span as the love seat immediately behind the shorter seating, with lamps at either end and a themed decorative item in the center. A coastal cottage features a vintage pond yacht; a tropical retreat gets a flowering orchid plant; a rustic home borrows some personality from a weathervane. The storage outside the seating “L” hides a home office, networking equipment or a mini-library. It might incorporate a narrow desk and slim seat, all partly disguised from the arrangement on the sofa table.
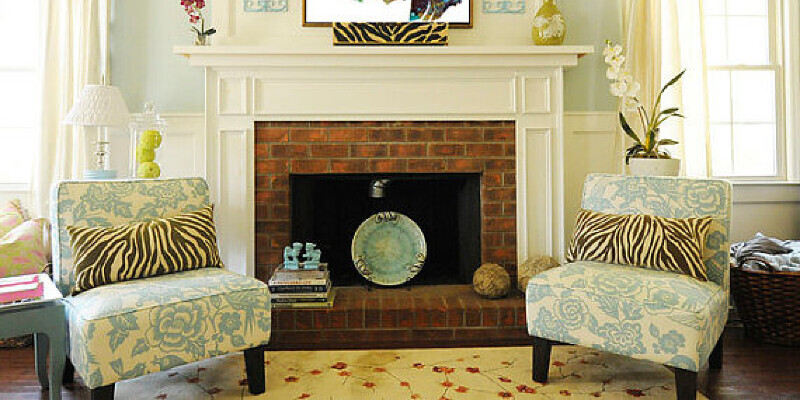
Break It Up

Produce several seating areas in a long, scrawny room and bounce light around the narrow area with lots of large mirrors. A conversation grouping with the sofa and a couple of seats sits on an area rug from the windows. Farther into the corridor, a small table and four chairs is a romantic dining area or “game room .” Along the wall, by the dining table and chairs, a love seat invites guests to relax with a drink or a cup of tea served from a sideboard. The long room is multi purpose without being crowded — sofa and love seat positioning separated provide you more options for using the room.

See related

Decorative String Light Ideas and How to Plug Them In

Light strings come in all sizes and fashions, miniature bulbs to medium globes, cowboy hats to mini paper lanterns to chili pepper contours. Don’t store them for Christmas. Use those trails of twinkles in an enlightened way — to bring some sparkle to your patio, brighten a dull bedroom, then create circles of light in unexpected places or outline a architectural detail. Because you can find light strings which run off solar batteries or power, your decor is limited only by your own imagination.

Star Ceiling

Pull the heavens down to hover just above your patio or backyard retreat with strings of white or LED holiday lights. Stretch two lengths of clothesline from trees, trellises or an outside wall into a fence. Hang parallel strings of lights from the clothesline to create a ceiling of stars over a table or conversation area. Combine each string into the following at the clothesline, securing the plugs unobtrusively into the line using twisted cord or plastic wire ties. Plug the final light string into an outdoor extension cord which reaches a power socket. Bring power into your garden clearing any distance from the home by burying a sturdy weather-resistant extension cord in PVC pipe which runs from the outdoor outlet to the location in which you need to plug in lights.

Wreaths and Garlands

Hang a line-up of holiday wreaths on your hallway or garland the mantel in twinkling greenery without worrying about a nearby electrical outlet or concealing extended awkward extension wires. Wind strings of battery-operated clear or coloured lights across a bare grapevine wreath, a little wreath of twisted cedar, or a pine-cone wreath, dusted with artificial snow and glittering with tiny lights. Simply hang the wreath in which you want it and then flip on the light string after dark. The identical benefit allows you to garland the mantel with seasonal greenery, twined with light strings. Turn on the battery-powered lights in the garland and light a few pillar candles on the mantel for a sparkling hearth.

Informal Dressing Room

A rustic ladder made from branches does double duty in an all-white bedroom when you hang a gorgeous silk robe or several parts of romantic vintage clothing off one side and lean it against the wall next to a full-length mirror. It is ideal if an electrical outlet is at the foot of the ladder or the mirror but , otherwise, you can always catch a extension cord. Drape one or two white-wire, large-white-bulb light strings over the rungs of the ladder on the side next to the mirror. Wind the strings around a few of the rungs to fasten your casual draping set up. When the lights are turned on, they make a beam of light which illuminates the mirror and adds an unanticipated decor touch to the space.

Shine on Shapes

Use light strings to outline a indoor arch, creating a magical portal into a party room. Dazzle the neighbors using a bare tree, wrapped in outdoor light strings that glitter across the trunk and main branches. Stick to a single shade wax for maximum architectural impact — the archway or the tree shines as if its aura is shown if the lights are about. Discreetly tape the ends of the strings, and their connections, to make them less visible and hold the lights in place. Attempt to link to an extension cord close to the tree base or the baseboard to improve the illusion without drawing attention to how it functions. Hunt for solar-powered light strings to decrease the expense of illuminating the tree.

See related

Inexpensive Ideas to generate My previous Bathroom Vanity Appearance Brand New

Give a vintage bathroom vanity a fresh new look instead of replacing it completely. Take a look at the vanity as a whole to ascertain what about it bothers you the most and focus on that area. Sometimes, jazzing it up may be as straightforward as replacing the hardware on drawers and doors, or even dressing up the door and drawer fronts to provide them a bit more character. Paint offers another inexpensive way to earn the vanity look new, whether painting the bit a good color or giving it a antiqued or distressed look.

Hardware Assist

Outdated, worn or hardened hardware drags the look of the whole vanity, even when vanity itself is in great form. Replace all of the old hardware, such as door hinges, with bits matching different metals in the room: If the toilet’s towel bars have a platinum finish in a sleek style, seek out vanity handles, hinges and knobs which stylistically match. For an even less costly revamp, clean up the outdated hardware and repaint it to match the other metal components or fittings in the bathroom.

Color Change

Whether the present evaporate end is painted, varnished or laminated in a finish that doesn’t match the room’s decor, then a fresh paint color completely changes its look. Clean out the vanity and remove or mask off the sink and hardware with tape. Sand, then unlock it using a primer designed for the stuff. Paint it with a few coats of a washable, moisture-resistant interior latex paint such as a high-quality satin paint. Seal it with polyurethane later, if you prefer, for extra protection. Should you prefer a pattern apart from a good paint color, create a layout such as chevrons or stripes using strips of painter’s tape to plot out the layout, or provide it a shabby chic- or even cottage-style makeover by painting it one color, rubbing wax above it, then painting it a second color, sanding through the topcoat in some places. Scrub stain or nesting glaze over the whole painted vanity; then wipe off it all, to provide an old look in another manner. Gray, yellow or brownish add an aged look. Test an inconspicuous area first to ensure you like the glaze or stain color.

Go Faux

Sometimes, the base of this vanity suits the look of the bathroom space, while its nesting laminate top reflects a color selection from decades gone by. Sand the laminate top gently to earn a primer stick better; subsequently apply a primer specifically designed for slick surfaces such as laminate stuff — some companies provide paint made just for countertops. Paint the countertop with a faux stone finish such as granite or marble using latex paints — apply a base coat in the dominant stone color; then sponge or brush on tinted glazes containing different colors found in the stone you wish to copy. A feathering brush helps soften the transition from one shade to the next. Use a real feather or an artist’s brush to add the veins found in marble. Practice your faux-stone techniques on scrap cardboard or wood to have a feel for color-blending for a more realistic effect.

Alter the Base

Give an inexpensive vanity an update that costs little but appears lush simply by replacing the base with bun feet or furniture legs. The new legs make the vanity look like a high-end bit of repurposed furniture instead of a straight-from-the-store cupboard, particularly if you repaint the vanity and add new hardware. Based on how your vanity is made, this may necessitate propping up the present cabinet since you operate, or completely dismantling the vanity to get the bottom of the cupboard to add to construct a supporting frame to attach the toes after you remove the present indented base. New furniture feet or legs are available from home improvement stores.

See related

How Do I Store Items in a Small Bath Without Vanity?

Every inch counts in a small bathroom with no vanity. A pedestal sink or floating-shelf-style sink may be a good-looking space saver, but it lacks storage for bath essentials, from tissue into toiletries. You don’t require vanity storage with shelf, bin, hanging basket and built-ins which you can make.

Pedestal Skirt

You have plenty of storage space beneath a pedestal sink when you enclose this area with fabric panels. Hem two panels to size, so they hang from only under the sink into the floor, meeting in front for easy access. Hang them with hook-and-loop tape, so that you may take them down to launder as needed. For a little toilet, use outwardly patterned fabric with stylish punch.

Up the Wall

Explore wall storage ideas if you don’t have a vanity. Safe a wine rack near the sink or bathtub for rolled towels. Mount wooden boxes by their seams in staggered or straight lines for lotions, makeup or hair-styling appliances. Fix a magnetic strip into the wall to get hairpins, tweezers, nail clippers, scissors and other small metal items. Even toothbrush holders come in wall-mounted varieties, and a few full-length mirrors have storage supporting them, built into the plan.

Bar the Door

Should you ignore the door, you’re missing various storage opportunities, other than towel and housecoat hooks. Hang two or three towel bars over the door, not only for towels, but also for little cloth bags to get color-sorted laundry to contain dirty clothes. Insert a few S-hooks into a bar for hanging bathroom brushes, loofahs or some other smaller items with holes or loops in their handles for hanging.

Over-Door Storage

By framing the door’s upper sides with decorative corbels, you bring the eye up, increasing a little toilet’s visual stature and developing a place for the over-the-door shelf. Use this storage space for tissue roll jars and storage of toiletries, like cotton balls and swabs.

Hang Ups

Decorative chain is not only for swag-style lamps;, if it’s installed to toilet and electrical codes, then such a lamp brightens and enlivens a little space. Hang bronze, bronze or gold-colored string from the ceiling near a wall. Use clothespins to hold small items, from makeup bags to just-washed undies to dry on the string. Hanging near the sink, three-tiered fruit baskets make ideal storage bins to get folded facecloths, hand towels and prettily packaged soaps.

At the Wall

Conventional shelves protrude, consuming inside space. Recessed nooks or built-in shelving does more than provide extra storage space, in addition, it makes a small bathroom appear bigger. Open the wall and construct shelves involving studs — or heavier, depending on the adjoining room — in areas where plumbing and wiring are not in the way. This creates a more seamless, streamlined appearance, letting the eye to travels into the nooks, as if the walls are pressed.

See related

How to establish a Christmas Village at a Bay Window

The finest Christmas traditions have an element of nostalgia to them — a sense of fragile history and childhood magic recaptured for a short time, and then overwhelmed again by the requirements of a new year. The Christmas village is just one charming annual show that romanticizes Christmas Past in a miniature world of storybook houses, sparkling snow and holiday icons. In case you have a bay window which overlooks the front part of the home, you may share the dream with passersby and arriving guests.

Lightfall

Hang a curtain of waterfall icicle fairy lights over a bay window to illuminate your small stage. Change the elevations using empty, clean, cardboard food containers and shoe boxes, turned upside-down and covered with a blanket of freshly fallen fake ice. Setting some LED light strings beneath the ice makes the whole village gleam from within. When you put the little shops and houses, poke holes in the ice blanket to pull some lights to the buildings so they throw a warm glow out their windows over the snow.

Winged Carolers

A dream village produced from decorated wood birdhouses catches Christmas fairies, angels and bright red cardinals in mid-flight. Buy an assortment of small birdhouses from a craft shop and assign the young artists in the family the job of decorating them. Supply paints, patterned papers, vellum for window glass, scraps of fancy trim, buttons and bits of decoration — anything which will embellish and personalize a Christmas village home. Spread a carpet of fake grass over a bay window ledge, give it a light spray of fake ice and also arrange the one time houses. Perch winged fairies and busy Santa’s elves on, in and about the houses. Suspend gossamer angels and feathered birds from monofilament line above the village. Hang light bulbs in the center of vellum cylinders with snowflake punch-outs to illuminate the scene.

Winter Wonderland

Ring your village and fill the square with winter actions that call up simpler times. On a flat round mirror “pond,” position miniature skaters with old-fashioned costumes and trailing mufflers. Assign a doll family to haul a bottle brush tree to town on a very small sled. Spray pine cones fir-green, then spray them again using a dusting of fake snow, and set them alongside the houses as trees. Place one gingerbread house prominently in the village and put additional dolls around it, decorating it with candies, candy canes, icing and gumdrops. Collect a group of children to build a large snowman of polystyrene balls, at the middle of town.

North Pole Village

No rule says the bay window village can not be Santa’s workshop and residence, so create a dream North Pole in front window. Use your heirloom ceramic Christmas village houses, lightly dusted with fake ice or ice glitter, for the periphery. Then paint and decorate DIY cardboard “putz” houses to be Santa’s own house with Mrs. Claus merrily baking cookies and the bustling workshop filled with elves and mini toys under building. Park the sleigh right out front on a snowbank and start with the reindeer grazing for sprouts of green poking up through the ice. As Christmas approaches, tap on the reindeer to the sleigh and start to fill a significant deck with toys. On Christmas Eve, hang Santa’s sleigh in the “sky” from clear monfilament line, as he sets off on his trip to reap all of the good boys and girls.

See related

What Color Walls to Tone Down Natural Hardwood?

The flooring and walls provide the backdrop for the furnishings and decorations in almost any room, and how you combine their colors determines what else will seem good there. Toning down the colors of your hardwood flooring makes it possible to create more visual space for your furnishings to occupy, and you may do this together with your selection of wall color. The crucial thing is to avoid contrast in the hues and color values.

Determine the Floor Color

Most wood floors incorporate a mixture of colors, but one shade usually stands out; in most circumstances, it’s a wood tone. Blonde woods like maple, birch, ash and, to a point, white pine, usually tend toward warm yellow, while darker forests are usually a mixture of the deep and hardened brown. Comparing your flooring color to the worldwide wood tone pigments — raw and burnt sienna, raw and burnt umber and yellow ocher — assists specify the tone you want to handle. If the timber has a stunning grain pattern with contrasting colors, you may look for an in-between tone rather than selecting one or the other.

Keep Matters Warm

Once you’ve decided on the colour of this ground, the task of deciding upon the wall hue gets simpler. The best strategy is to keep it analogous to the ground color — warm wood tones contain yellows, browns and oranges. Green is on the outer border of this analogous zone for most wood tones, but it functions well with hardwood floors which have eluded of raw umber — particularly birch. If your objective is to draw focus away from the ground, it’s best to avoid highlighting it using colors that contrast, which can be on the blue and purple side of the color wheel.

Dark-Colored Floors

The value of this color you are using on the walls also affects the visibility of this ground. A dark flooring stands out when contrasted using a light wall color. That doesn’t mean you have to turn the space into a dungeon if you happen to get a dark ground, however. If you maintain the wall hue close to the ground shade, the contrast made by a lighter shade generally isn’t an issue. Dark colors on the ground and light colors on the walls and ceiling tends to draw the eye up and away from the ground.

Light-Colored Floors

If you want to draw attention away from a light-colored hardwood flooring, don’t paint the walls dark. Even if the wall and flooring colors certainly are a close match, it is going to be tough to avoid noticing the flooring. To earn a light-colored floor disappear, match the colour and value of this shade on the walls or neutralize the walls by painting them a light shade of gray. Keep the attention away from the floors by providing eye candy in the form of ornamental trim, colorful furnishings or a major decor feature, like a big window or mirror.

See related

What Color Warms Up Whitewash?

Whitewash lends itself to numerous decor styles, but it may appear cold and unappealing if there is too much blue or gray in the mixture. Warm up whitewashed interiors with touches of color from subtle to bright, using nature and found materials or objects to balance a room.

Nature’s Way

Whitewash typically is uncolored, although it may be tinted with paint hues to resemble old limewash, earth-stained by metallic oxides or pinked with animal blood. Unbleached linen upholstery against whitewashed walls or artwork frames warms the tone at a room as does a natural sisal carpet, sand-colored ceramic-tile floors or big woven baskets made of rush or split-wood strips. Adding architecturally-inspired contemporary furniture such as layered chairs made from unpainted cardboard is another way to remain minimalist without being stark.

Peachy Glow

Peach warms any surrounding and may take on vintage character with a whitewashed armoire repurposed as a kitchen pantry, or even a four-poster bed and hand-me-down whitewashed dresser at the guest room. Apricot adds the barest hint of sunshine while full-blown ripe peach subtly tints light. Rose and blush additionally cast flattering tones over a whitewashed wall or table and seats; blush walls at a breakfast nook work with antique flowered china on a whitewashed booth along with seat.

Rust and Stone

A old stone fireplace warms a whitewashed room with the diverse stone colors that change with the lighting. For a warmer sense, look for stone that has browns, creams and orange in it rather than a blue slate or cool-gray granite. Weathered brick balances the severity of white. Faux rusty metal is just orange enough to highlight the warmer side of the color wheel. Use small pieces of rustic farm gear covered in a patina of rust spray it with a clear fixative to stabilize the end — as wall art in a whitewashed living or dining room. Lacquer rusty metal shelves or old lockers to get country-kitchen storage alongside whitewashed cabinets.

Whitewash and Wood

The heat of timber is a natural with whitewashed walls and furniture. Bleached wide plank floors have just enough color to mitigate the austerity of the all-white room. A cherry hardwood sideboard is just a foil to a whitewashed dining table. Maple cabinets change a whitewashed kitchen in “cold” to “country.” A burl or birdseye maple nightstand enlivens a shabby chic-style whitewashed bedroom. A lacy sandalwood screen in the corner adds visual texture to whitewashed walls in a living room or den.

See related

How to Recover a Chair Using Vinyl

Stain- and – moisture-resistant vinyl makes cleaning an upholstered dining room chair a cinch. Most chairs have chairs so that you replace it with vinyl and can quickly remove the upholstery that is old. Vinyl is available in limited colors and patterns, but you might also use a patterned vinyl shower curtain that is thick or tablecloth to get a upholstery project.

Vinyl Choice

Upholstery vinyl that is sturdy is thicker than vinyl made for different purposes. It frequently includes a cloth or felt backing that helps prevent it from slipping or tearing. If you’re upholstering an chair, consider sea or fade-resistant vinyl, which offers more protection from the sun. You may use transparent vinyl over another cloth, although vinyl might be available only in limited patterns. Alternatives include texturing and mildew resistance. Choose a thick but pliable kind so it is simple to shape it when selecting a vinyl.

Chair Seat Removal

Most chair seats are attached with nails or screws accessed from the bottom of the chair, but some chairs may simply pop out with gentle pressure from underneath. Some dining room chairs might also feature an upholstered part. This section is removed in the same fashion as the seat, or so the upholstery might be connected with upholstery nails around the perimeter of the seat back. Remove the staples holding the upholstery in place, after removing the seat and back. If it’s possible to remove it in one 19, the upholstery produces a pattern that is suitable for your vinyl.

Upholstering Planning

Before you reupholster sanding, painting or staining the chair is done. Smooth any rough spots out and pull out any residual tacks or nails that held upholstery or the seat in place before staining or painting the chair. Inspect the foam on seat and the seat back. Peel it off the seat board if it’s overly compressed or hurt and replace it. Cut a bit of upholstery foam to exactly the identical shape as the seat board. Glue it in place with a spray glue and allow the glue to dry before upholstering.

Vinyl Installation

The foam is smoothed by A layer of batting over the cushion’s surface and makes the pillow less angular. Cut the foam batting large enough to wrap the surface of the seat over and hang each side by 1 inch. Cut your vinyl to exactly the size. Wrap the batting taut over the surface of the seat, folding the overhang below the seat. Staple it. Fold to make a crisp border. Repeat the procedure with the vinyl. After trimming off vinyl or some extra batting in the bottom reattach the chair seat. If the vinyl is connected to the seat back with upholstery nails, fold to make a fresh edge and nail the borders to the seat with tacks or upholstery nails.

See related

Feathers for Your Nest

I have been seeing the backyard-chicken craze play out in my neighborhood for years. I aspire to raise my hens, but in the meantime I’m content chicken sitting for many buddies, reaping the rewards minus the dirty work. While I devour the delicious eggs I get as payment, it is the hens’ lost feathers that I covet most, because of their longer-lived design benefits. Autumn is a particularly good time for bringing this natural beauty inside and using feathers to add a comfy layer for your nest.

Jen Dalley ||||||||||||||

For the past five or so years, I have enjoyed caring for 20-plus hens of buddies, and they’ve graciously donated many feathers to me.

Why chicken feathers? I respect feathers from all birds, but I’m always leery of feathers I find on the market, because I don’t have any idea where they came from or how humanely they had been recovered. That no garden pet has been hurt or killed for the feathery gifts I get is essential for me. Plus, I really like the variety, as well as the unbeatable price (free), of amassing what could otherwise be raked up and tossed.

Of course, if you don’t have garden hens or want to use a different feather kind for your job, you can always visit a local or online craft store.

I keep my collection in a pot from Paul. The petiteness of this black clay container is ideal for feathers of the dimension, which were supplemented by plumage my loved ones and I’ve fortuitously stumbled upon during our struggles. These additional feathers include a few from our local barn owls and crows as well as a turkey vulture feather we discovered along a horse trail. These couple of tall ones add just the correct dimension to what is mostly a chicken-centric display.

Every feather in our collection has a happy memory, as does the pot that brings me back into the Toulouse train station where I bought that yogurt. Therefore, the decoration is a particularly noteworthy and reassuring one in our household.

Sometimes the hope of finding more feathers is sufficient to motivate my loved ones to package to get a crisp autumn evening walk.

Chicken feathers come in many different shapes, sizes and, based upon the varieties of chickens you tend to, colours. The more feathers come from the wings and tail, while the bigger, fluffier ones stem from other areas of the human body. Each feather provides different opportunities for home decoration.

Let’s discuss cleanliness. Yes, garden chickens are dirty animals — though, based on the time of season, it may feel as they molt quicker than they can poop. Take advantage by picking the cleanest lost feathers you may find.

I asked earring artisan Dianne Tanner her favorite way of cleaning her discovered feathers before she crafts them into jewelry. “Making sure that the feathers I sell are safe and clean is of extreme importance to mepersonally,” she says. “First off I suspend the feathers. Sounds strange, but after extensive investigation, I have found that freezing them for at least 24 hours ensures anything which may live on them is taken care of, without compromising the feathers’ structural integrity.”

Tanner sets her feathers in plastic baggies for close to a week to make sure any pests and bacteria are all dead. After she fixes down the feathers with tea tree oil on baby wipes (only a drop of oil in a time) to make sure that the feathers have been disinfected. “Tea tree is a natural antiseptic, and is a lot nicer on the feathers than using anything compound such as alcohol, which will destroy the natural oils from the feathers and make them loose form and prettiness,” she says.

Once they’re smoothed into position, the feathers are ready to use in many sorts of manners.

Mindful Designs, Inc..

Feathers for Decor

Frame them.
This kitchen has been decorated with multiple sorts of tail and wing feathers in a shadow box.

Bubble this up. Show off a favourite feather within a clear glass ornament. The shorter, fluffier body feathers work best for spheres because of their curved silhouette, while a stiff wing or tail feather would work best in a tall, slender ornament.

Insert the decorations into the Christmas tree or store them up all year round across the table, since this homeowner has completed.

Mineheart

Magic Feathers – GBP 25.50

Magnetize them. This assortment of feathers is reinforced by pairs of magnets so that they may be stuck on a metal surface. You could do the same to your assemblage with magnets and a dab of hot glue.

Utile et Futile

Feather & Poetry – EUR 26

Stand them up. This feather holder lets you display your collection vertical. You can keep other prizes which may come together with the search, such as shells, stones or other small objects, in the drawer.

Flea Market Sunday

Bunch them. This homeowner tied an arrangement of three similar feathers together with a ribbon and added it into a side table along with other organic particulars. To create a similar appearance, group the longest tail feathers you may find. In case you have a rooster, add his tail feathers into this arrangement for a dazzling appearance.

Inform us Do you decorate your nest with discovered feathers?

More: Browse feathery decoration in the Products section

See related

10 Chandeliers for Those Who Don't Like Chandeliers

I have never considered myself a chandelier individual. It was too much exposure. No matter the reason, I find nearly all of them a bit too goopy and pretentious for my taste.

But figurines actually play a valuable role within an interior. They produce ample light (frequently quite flattering), provide an anchor and a focal point in a room, and can decrease the perceived ceiling height, so a table or seats group feels more intimate.

Happily, there are lots of chandeliers out there that manage to keep the glitz factor securely in check. They all remove the crystals in favor of humbler stuff, which feels more modern to me. Here are 10 of my favorites, however, don’t hesitate to suggest your own.

Candelabra

Regina Andrew Scalloped Wood Bead Chandelier – $1,247.50

I find beaded chandeliers a lot more appealing than crystal ones. This version would look fantastic at a beach home or country home, and might be entertaining paired with a classic dining place — to soften any conventional borders within the room.

Alpha Design Group

I really like the design of this Quadralli No. 331440 Linear Chandelier. It would look great in a Arts and Crafts inside but would be equally at home in a modern or traditional setting. Each bulb is encompassed by scrims of white crepe and shimmering organza, giving a softness into the light that’s instantly alluring.

Layla Grayce

Oly Studio Isa Hardwood Chandelier

Oly was the primary producer that got me thinking otherwise about chandeliers, and this design had a great deal to do with it. I really like the form, the patina and the dangling wooden bits. It seems to be poking fun at the conventions of the chandelier, while being a handsome design on its own.

Carey & Co

Introduced in 1997, Ingo Maurer’s Zettel’z 5 Chandelier seems a little like an explosion at a paper mill. Eighty notes are clipped to cables: 31 are printed with expressions of love and desire in various languages, even while 49 are left sterile, inviting the user to jot down his or her own sentiments.

It took me some time to warm up to this particular piece, but I really like the interactive nature of the design and the way it includes the proprietor in its own creation. Plus it’s a great conversation starter!

Shades of Light

Twig Chandelier, 6-Light, Little

This might look like a hot mess to some people. But at the ideal setting, it’s divine. Warm and attractive, this chandelier controls attention without ostentation or surplus, just the primal allure of nature.

Stacy Bass Photography

I am a sucker for the shore, so I couldn’t resist the siren call of this Southampton Big Chandelier. The ring silhouette is superbly proportioned, and I like the way the pearlescent shells swivel and sway in the breeze.

Horchow

Salento 6-Light Chandelier – $395

This chandelier has a stripped-down, Swedish country sensibility that’s quite endearing. The arms are similar to flourishes at the end of a signature, with subtle small loops that culminate in vintage-looking electrified candles. This is one of the few chandeliers I think works well without shades. The price is quite attractive, too.

Zuniga Interiors

Like I said, I am a fan of Oly Studio’s chandeliers, and this Jenny Chandelier has always tickled me. Strands of abalone shells are treated to a classic silver finish, giving this fixture a surreal quality that’s a bit over the top but mathematically endearing.

Abigail Ahern

Neo Baroque Chandelier

Wirework flourished as an art form in the 19th century and can be celebrated now in this whimsical piece. Grand in scale (and ambition), this design pokes fun at the opulent chandeliers of yesteryear while creating its own contribution to this tradition.

EcoFirstArt

Milk Bottle Chandelier

The Dutch design firm Droog has been turning out contemporary masterpieces since 1993. Its Milk Bottle Chandelier continues in that tradition, with everyday objects elevated into works of art. Provocative and surprisingly simple, this is a fitting choice for a contemporary interior.

Browse more chandeliers in the Products section

See related

Copyright h o m e s t a y b e i j i n g 2 0 0 8 2024