Zen Garden

Buddhist temples in Japan were the first sites of Zen gardens, that can be simple landscapes of sand, rock, plants and water that serve as places for reflecting and meditating.

Daryl Toby – AguaFina Gardens International

Lines in sand signify rippling water at a Zen garden, where simple objects of nature are used to create a place for contemplation.

Garden Mentors

Zen gardens are made to create a stripped-down awareness of thought.

Urban Earth Design

Zen gardens support relaxation through their artwork.

Photos: Browse more Zen garden-inspired layouts

See related

10 Broad-Stroke Ideas for Selecting and Displaying Art

Art can pull a room together, although the ideal ways to exhibit it can seem evasive. We hope the artwork we exhibit does not feel to be an attachment into the furniture. We need it to reflect a sense of our tastes and deeper selves. And so searching for the ideal piece — and the ideal spot for it — can be intimidating, a challenge that people set off. Here is help so that you may rise to the challenge.

Blue Tangerine Art

A combination of paintings, sculpture and photographs collected over time and journeys weaves a layered tapestry about the interests and aesthetic. Consider which medium you prefer and where your tastes lean before you start shopping. The goal is to pinpoint bits that mean something to you personally, not simply choose decor to meet wall space.

Upscale Construction

Ascertain how much space you have available and search for bits which are the ideal size. A rule of thumb is to get the artwork fill two-thirds into three-quarters of the wall. Size matters — for modern art, bigger is far better to maximize effect.

Beckwith Interiors

Another rule of thumb for hanging artwork would be to centre it at eye level. Consider if you’ll usually be sitting or standing in the space, and select your eye-level elevation so.

Twenty7 design

Photography looks best mounted in Plexiglas or acrylic frames. Dare to be edgy when utilizing art photography.

Incorporated

When hanging art above a sofa or another piece of furniture, like a credenza, keep the bottom edge of the frame 6 to 12 inches above the furniture.

Thom Filicia Inc..

Large-scale bits can be more expensive. If you can not make that form of investment yet, create a gallery wall of prints piled together to take the place of a big piece. Reframe bits you already own to give them a brand new life.

Incorporated

For a budget-friendly piece, stretch a handsome, high-quality cloth across a clean canvas or stretcher bars.

Wish to Inspire

A constant question is how to integrate a flat-screen TV to a design strategy. A lively gallery wall can help.

Dayne Keating

Use works by the same artist or works which have a common style to bring cohesiveness and a curated feel to the artwork on display. Notice the way the red pillows and pomegranates complement the red tones in the artwork.

Croma Design Inc

Try making artwork the inspiration stage for a whole room’s color palette and material options. Does not this tranquil bedroom look like it had been informed by the art, rather than the art being added in the end?

Dillard Pierce Design Associates

Your turn: Have you made artwork a showstopping centerpiece in your property?

See related

What's the Big Idea? In Architecture, It's the Parti Pris

The term”parti pris,” generally abbreviated to”parti,” literally translates as”passing point,” however in architect lingo it often refers to the project layout’s big idea. It signifies an architect’s entire guiding idea for a design. As such, a parti generally has less to do with technical, fiscal and technical issues and much more to do with perspective, massing, scale, transparency, opaqueness and other architectural problems. While not every design starts with a parti pris, it’s typically better as it does. The overall guiding idea, or passing point, can strengthen the last result, as the design won’t become confused.

An architect will generally tell you up front what the parti is to get the design. If not, be certain to ask. It is one way of earning certain that you and your architect are on the same page as you work together to create the house of your dreams.

By the way, the term, which is French, probably originated in the Ecole des Beaux-Arts, the 19th-century French architecture college.

Yamamar layout

The parti pris, or large concept, could be on the home becoming translucent and framing viewpoints. A horizontally composed linear band draws the eye in this one, even though a vertical totem arrests which motion. The architectural idea is to control sight lines and highlight the stunning view.

Scott Allen Architecture

Scott Allen Architecture

Perhaps the large idea is to get the home”disappear” in the entry side (this photo), seemingly hiding at a park-like setting so that it can be a party of light and transparency in the water’s-edge side (previous photograph ).

Kristina Wolf Design

Perhaps the large idea is to reestablish an old firehouse, breathing new life and another use into the structure. A desire to retain remnants of this original use would surely qualify as a passing point for the overall design.

Elliott + Elliott Architecture

Perhaps the large idea is to create a set of little houses, each with its own function yet grouped together to make a family room. Such a parti yields a very different house than just one where each of the functions are gathered under one roof.

Torsten Ottesjö

Perhaps the large idea is to be little and anything but standard.

Demerly Architects

Perhaps the large idea is to respect a component of the context whilst trying to accomplish something entirely modern. While the form this is of a classic gabled roof home as a child would draw it, the overall effect is just one of modernity.

Perhaps the significant idea is in how the floor plan is composed. An L-shaped plan which creates different public and private legs that open to exactly the same terrace provides the passing point for your own design.

Tell us What big idea would you love to utilize for your house?

More: 8 Things Successful Architects and Designers Do

See related

A 'Portlandia' Home Raises an Eyebrow

The aptly nicknamed Eyebrow House catches the attention of anyone who walks past it — just as it did with all the location scouts for IFC’s hit cable show Portlandia. The spaceship-style back and advanced interior helped to inspire and set the scene for the plight of an alien played with a durian fruit at the episode “Feminist Bookstore’s 10th Anniversary.”

However, before this home was famous, it had been just a plain-Jane 1941 artificial Cape Cod home. Because it had no major period details to speak of, architect Edgar Papazian treated it as a blank slate for his brand new family home. Increasing square footage was a must, but he wished to do it at a sensible but one of a kind manner, blending new and old elements to make a really original home that is no doubt appreciated by the present owners as well.

at a Glance
Developed for: Edgar Papazian, girl Giovanna and spouse Michelle Lenzi
Location: Mount Tabor neighborhood of Southeast Portland, Oregon
Size: 1,300 square feet; 3 bedrooms, two baths

In the episode, an exotic durian fruit comes to existence, finally taking off because of its alien world in this quirky residence. It’s easy to see where the spaceship feel comes from if you have a look at the back of the home. After the episode aired, Papazian discovered that the author had actually changed the sketch when he saw the home, giving it a bigger role.

Curves stick out on the house’s previously boxy shape and keep into the interior. The new curving shapes reflect a more modern sensibility and draw the attention to the home.

The curved addition on the second floor resembles a single raised eyebrow. Originally this upstairs space was a narrow attic-like room. Adding more room upstairs would ordinarily mean utilizing dormers, but Papazian thought it’d give the little house a top-heavy look. Instead he used steel galvanized arches, which make more room but still allow for a streamlined exterior. White asphalt roofing reduces solar gain.

House amounts: Atlas; front door manage: George Ranalli, Lock-It

Steelmaster galvanized arches compose the curved shape and the interior finish of the upstairs bedrooms. Normally these arches help make Quonset huts.

Carpet: Shirt Stripe Button Down and French Cuff, Flor; java table: Alexander Girard, Knoll

The steel arches bring the spaceship feel inside, too. It seems fitting that the floating, luminous alien durian would call this place home.

To insulate the arched roof, Papazian came up with a method with purlins bolted on top of the arches. Sheathing and roofing connected to the purlins, and soy-based foam insulating material, fill the pit between the roofing and the galvanized arches.

The new addition also left space for Papazian’s daughter’s bedroom. While the arched upstairs allowed for additional square footage without expanding the property’s footprint, in addition, it meant that the rest of the 70-year-old home needed an entire structural renovation. The majority of the home was reframed and updated to take the new burden upstairs and suit local seismic codes.

Curved forms carry into the toilet; notice that the slope of the ceiling, the penny tile, the oval bathtub along with the round bathroom lovers.

Bathroom tile: Ann Sacks Savoy penny tile; toilets: Toto dual-flush; wall mounted sink: Villeroy & Boch, Oblic; hydronic towel warmers: Runtal, Fain

The curves continue down the stairs and around the primary bookcase — that Portlandia fans might remember the durian having to contact its home world.

During filming, Papazian must walk through the home to learn how they had set this up. “It was rather odd,” he states. “Books organized by colour, strange devices and knickknacks decorating the shelves. … It’s very odd seeing your home represented to you on a screen that you watch all other kinds of shows.”

Papazian moved the kitchen from the front to the back of the home, creating a continuous living and dining room with a transparent view of the garden. The kitchen was created as the middle of the home, since that’s where the family spent most of the time while they had been living there. “To me, with the cultural emphasis on food nowadays, the kitchen is actually the living area of our days,” he states.

Refrigerator: LG; cabinetry: Ankrum Nexus, Ikea; hood: Franke, Tube; cooker: Franke

Papazian spent about $15,000 on the kitchen. Cabinetry, countertops and shelving from Ikea helped cut down on cost. The butcher block counters flow visually with the fir tongue and groove siding onto the back deck out. Windows supporting the Ikea cabinets flip them into shining boxes on sunny days — the Portlandia durian also used this area to call its home world.

Two Ikea base cabinets topped with Ikea butcher block compose the massive island. Papazian had the curved borders added to replicate the shapes of the local central bookcase, drawer pulls and curved range hood.

The dining area, connected to the kitchen, shares the same clear view of the expansive, private backyard, with cedar and fir trees. Originally, two bedrooms sat at the back of the home, but their miniature windows did not take advantage of the lavish view.

Living chairs: vintage Series 7, Arne Jacobsen

The living area is still preserved in its original shape at the front of the home. A brand new fireplace and curved mantel jut softly out to the simple room. The first refinished and stained bamboo flooring now have radiant warmth, backed by a gas–fired tankless water heater.

Sofa: Natuzzi

The house’s joists — mixed with fresh ones — along with the outside walls are a few of the only remaining original capabilities. Everything’s been bolstered to match local code. This steel pillar, one of several throughout the home, helps bear the load of the new upstairs inclusion.

Bird feeder: Egg, J. Schatz

Despite the new renovations, this home still honors its origins. A number of the houses in this part of Southeast Portland were constructed by precisely the same developer, who consistently utilized painted cedar siding. When Papazian needed to rip out the first siding, then he replaced it with cedar Tyvek siding.

See related

The Way to Paint Your Hardwood Floors

Painting older solid wood floors can give them new life without the cost and mess of refinishing them. In addition, it can create your flooring a gorgeous design part in their own right, especially with intriguing patterns. It takes a little time and patience to paint wood flooring, but if you understand how to apply nail polish, then you already understand the basics.

Jeannie Balsam Interiors

1. Prep the surface. Start by scuff-sanding the ground with 150-grit sandpaper, advises Christopher Comer of Noble Pro Painting in Chicago. This hand sanding is not to produce the floor absolutely smooth but to demanding it up so the primer will adhere well to the surface.

2. Clean the floor. Vacuum up dust; wipe with clear water if necessary to get it all up and then wash with a wood floor cleaner. The most significant part this step is to let the flooring dry once they are washed — ideally two days and maybe longer. When there’s moisture in the flooring when you paint them, the primer and everything on top of it’s very likely to bubble up.

3. Put on the primer. Time to brush or roll on the primer — but what kind? “We recommend a penetrating, oil-based primer which may really seal up the surface tight, but a good latex primer can work well also,” says Phillip Storey of Redhill Painting in San Francisco. This is an excellent time to consult the local paint shop about the right product to use. You will normally need the color coats to be paint created especially for flooring. If this paint is latex, use a latex primer. If oil, then use an oil primer. Let it dry at least overnight, and if it’s an oil product, give it 24 hours or even a bit more.

4. Sand again. It may seem like overkill, but if you do not sand today, you may see the imperfections on each coat over this one. “We sand the primed regions again, as new wood fibers have a tendency to get bombarded with moisture and swell after falsified,” says Storey. This time use 220-grit sandpaper, which will earn a much nicer dust. Once you’ve finished sanding, vacuum and use a tack cloth to make sure all the dust is off the ground. Don’t use cotton paper or rags for this, since they’ll leave fibers on the ground that may ruin your paint job.

MAC Custom Homes

5. Put on the shade. You can use all 1 color or use painter’s tape to include shapes or patterns to the ground in another color. You may find some inspiration in these photos.

You can use a brush or a roller, but make sure to have the right equipment and that you set on a very thin coating of paint. “Apply it slowly with a 1/4-nap microfiber roller or natural bristle brush,” says Comer. “You won’t receive any bubbles at all with a brush, but it’s very labour intensive.” The roller will probably be quicker, he adds, however you have to roll very slowly to prevent producing bubbles. Regardless of what tools you use, think about where you may start and end up — do not paint yourself into a corner.

6. Let it dry. This is where the nail gloss analogy comes in. The basics of the entire process are like applying nail polish: base coat, color coat, color coat, topcoat. Every coat has to be fine and slim, not gloppy, and each coat must dry completely before the next one goes on. In the event the surface below the base coat isn’t clean, you will receive bubbles. The drawback with painting flooring is that there isn’t a handy ultraviolet light to make it all fix fast. After the first coat, then wait at least 24 hours before another coat.

Holly Marder

VOH Architects

7. Add more color coats. Two thin coats of color are adjacent, with 24 hours to dry in between. Don’t forget to paint on each coat as thinly as you can. “If you really do a thick coating of paint on the ground, then it remains tacky for longer and does not cure as well,” Comer.

9. Apply topcoat(s). For long term durability, it is possible to finish with one or two coats of a polyeurethane clear coat. Allow 24 hours to dry between coats. Again, the local paint shop ought to have the ability to point you toward an proper item. Start looking for non- or no-VOC coatings and paints to minimize the fumes.

Tara Seawright Interior Design

10. Wait. If you apply topcoats, you’ll need five to six layers of coatings on your floor. It’s a good idea to wait another day or so to walk on it, and then only in socks. The longer the floor is permitted to cure, the harder the end will be — like your nails!

More:
Are You Gutsy Enough to Paint Your Floor White?
guides to floors

See related

Plan Your Home Remodel: The Interior Renovation Stage

Follow the Improvement of Mike and Leann Rowe of Lutz, Florida, as they Reestablish a 1970s-era ranch Home in St. Pete Beach, Florida. Over the past couple of months, we’ve shown the way they found the ideal home, constructed their project team, assembled inspiration, established a budget, drew the programs and started building. The author is the project architect.

In the last installment, the outside construction was well under way. We were installing new windows and fixing the exterior siding, which had rotted in several places. Now we’ve completed the exterior, along with the local building department has shut out the license for that work, so we can proceed to the exciting inside renovations.

New closets, relocated plumbing, new finishes and moved walls are only a little what we’re doing. And all the items to go into the inside, from paint colors to furniture, must be chosen and arranged.

Let us take a look at how things are moving.

Bud Dietrich, AIA

The exterior has taken shape nicely. While we still have landscaping to do, the siding has been repaired and the new windows and doors have been installed. We have also had a new deck. We have painted the outside in a palette of driftwood-like colors to relate the home into the local gulf.

Before Photo

Bud Dietrich

BEFORE: The Rowes didn’t allow the house’s ’70s inside and “fast-food-restaurant storefront” frighten them. The dimensions of the home, general and location Florida split-plan arrangement were exactly what they were looking for.

Before Photo

Bud Dietrich

There was way too much wood within the home. In reality, some rooms had wood finishes on the flooring, walls and even ceilings. Although the plan was rather open, it felt all chopped up, especially because of a huge concrete beam that generated a true gap between the front and back of the home and obstructed the view of the water.

Before Photo

Bud Dietrich, AIA

This concrete beam, becoming uncovered here, affirmed the roof structure.

Before Photo

Bud Dietrich, AIA

This fresh sunburst window is where the aged storefront-style windows were. Big telescoping sliding glass doors now direct out into the deck and the boat dock. It’s Florida living at it best.

The new window and vaulted ceiling let in a lot of light and start the view across the bay toward the Pasadena bridge connecting St. Pete Beach to the St. Petersburg peninsula and the mainland. To carry through with all our casual beach-house theme, the vaulted ceiling is finished with wide-plank wood boards painted a soft white. Finally all of the trim in the home will be painted this white color.

Before Photo

Bud Dietrich, AIA

Looking into the balance of the inside shows just how much demolition function took place. Today we have a true feel for how spacious and open the primary living area will be with that beam gone.

Removing the old concrete beam was not all that catchy. We installed a fresh beam of laminated veneer lumber. This new beam was placed in addition to the old concrete beam, and also the present roof structure was attached to it. Whenever that was done, we were able to eliminate the concrete beam. The new beam will be above the ceiling, so it won’t be observable in the distance.

More on how to set up a new beam

Before Photo

Bud Dietrich, AIA

New walls have been erected new wiring has been run and the new plumbing lines for the island sink have all been installed. At the same time, we’ve been refinishing some the original wood paneling that we chose to keep, including in the skylight well. This wood will get the same soft white paint as the vaulted ceiling wood. There is no doubt that the inside will be a good deal brighter than it originally was.

Watch how the strategy for this open region came together

Before Photo

Bud Dietrich, AIA

The present concrete slab had to be cut and removed in areas to accommodate the new plumbing lines for the relocated sinks. While doing this isn’t the least costly manner of renovating a home, the final result — a massive island that enables a view from the kitchen sink from the water will be worth it.

Before Photo

Bud Dietrich, AIA

For the primary living space we’ve decided on Sherwin-Williams’ Copen Blue to pull the colors of the skies and water out. Before finalizing this color, we bought a sample could and painted a couple of areas to test it out. We also took a color sample into the furniture shop to make sure that it’d go with the leather recliner and cloth=coated sectional on order.

In regards to selecting a paint color, purchasing a sample painting and can several small places is the thing to do. Do not paint only 1 area, as color varies with the light. In the minimum, test your paint in a corner that’s in color and an area that gets bright sunlight.

Before Photo

Bud Dietrich, AIA

Another part of the renovation is that a zero-threshold shower. This has meant chopping out the present concrete and replacing it with fresh concrete set lower to adapt the tilework. When it is done, Mike and Leann won’t have to step past a shower threshold and maybe excursion.

Before Photo

Bud Dietrich, AIA

Talking of this shower, we’ve visited a few tile showrooms and have decided on a 16-by-16 slate for the master bathroom floor and 12-by-24 porcelain tiles with glass tile accents for the shower walls. The slate includes a lot of variation, from blue-grays to greens to rust colors. Along with the wall tile is actually rather nice. It’s named Touch, by Mediterranea, also it has a linen look and feel — the nifty result of an ink-jet-type production process.

Bud Dietrich, AIA

We have been working on finalizing the inside cabinets, working with Jim Douglas of Douglas Woodworking in Clearwater, Florida. Douglas has provided detailed drawings of this vanity as well as kitchen cabinetry and a few of the other bits we’ll be needing constructed for the home. Having drawings like these done early in the building makes it possible for each the electrical and plumbing work associated with the chimney to be coordinated up front, eliminating expensive and time consuming rework later.

Bud Dietrich, AIA

The granite for the kitchen counters is Delicatus White. It has a lot of movement, with browns and golds and grays all swirled together. This will work very well with the cabinets; some will be stained a golden oak and some painted in Valspar’s Wicker.

Bud Dietrich, AIA

Scores, if not hundreds, of items must be researched, selected and arranged in an extensive renovation. Leann, Mike and I have been going to light showrooms, tile and rock showrooms, furniture showrooms and a lot more places. When many individuals, including professionals at times, will wait until the final minute, the ideal approach is to select pieces early so they’re ready when needed onsite.

There also may be some thing you find that’s perfect. In this case and especially when it is a one-of-a-kind item, stake your claim for it when you can. This way you will be assured of getting exactly what you want.

Next: In a couple of weeks, we’ll have the rough work all done, the gutters installed along with the cabinets delivered and ready for installation. We’ll be close to getting the job wrapped up and ready for that inaugural party!

Next: The inside finishes go in

Start in the beginning: Component 1 of this Renovation Diary

See related

When to Give Your Home a Coat of Many Colours

If there was a place and period of irrational exuberance, it was America during the second half of the 19th century. It was surely a time when if a selection of one was great, then two had been better, and three or even more was not overdoing it whatsoever. It was a time when surface decoration became the standard instead of the exception. It was a perfect storm of the new industrialism that made nearly anything available and the existence of money for people to buy it all.

So that it is not surprising that a number of the houses of the age were done up with lots of particulars — and tons of colors. Why pick just 1 colour when the entire rainbow is available? And do not skimp on the details, because every colour needs its own place to break.

While at the early 20th century that the entire world turned its back on this riot of colour, retreating into the protection of an all-white planet, the beauty, richness and joy of the “painted ladies” of the 1800s has been rediscovered. Therefore, in the event that you have it in you, and your span or period-inspired house has the architecture for it, please do not stop with just a couple of colors.

Imagine a whole streetscape filled with brightly colored and multichromatic houses near together. Walking down a road in this way could be a visual treat, with house after house being more joyous than another.

These famous painted ladies in San Francisco march down the hill in multicolored splendor. Even though the primary colors of their bodies are soft and silent, each detail and material is articulated by form, texture and colour. The articulation was often achieved here by varying the tone and color of the major colour, but it may also be reached by employing a complementary (or almost complementary) colour.

Thus a light green gives way to a darker green aspect, for example, and the trimming is not white but all creamy and soft.

Alex Amend Photography

As we get nearer to those houses, we begin to find the details and colour intricacies. Golds, taupes, mauves and more all pull out the inlay and overlay details which enliven the surface. Both the carpenters and the painters have to display their craft and skill.

And we see something new each time we walk. Because, after all, these houses are meant to be seen and appreciated from shut up, not whizzing by at 35 mph.

Farallon Construction Inc..

No face is left unadorned. Even the undersides of these eaves receive a rich treatment of colour to highlight all of that architectural detail. It’s the type of feast for the eyes which only a multichromatic palette may bring out.

B Birmingham Inc..

The point that can’t be stressed enough is that colour strengthens the architecture. So however subtle the detail, like the way the corner is created in a box bay, colour strengthens the proportion, scale and overall architecture.

Just imagine if this trimming didn’t step in to form the corner or if the color were the same. The entire home’s proportions could be thrown off, and the overall result would be nowhere near as interesting.

Warline Painting Ltd..

Of course, there is also the use of complementary colors in bold colors. Not for the shrinking violet, these colors will make your house really stand out. And while it is from a little distance that we more often get to love these houses …

Warline Painting Ltd..

… it is really from close up that we see just how artfully the colour palette has been employed. Each piece of molding, trim and detail is painted differently in the main colors to draw attention to it. And each texture is not the same colour, so we get to experience and revel in the diversity of it all.

Degnan Design Group + Degnan Design Build

These colour schemes are not just for old houses. A newly developed home near the Jersey Shore uses colour just as it had been used in the 19th century. A scheme which uses colour to pronounce each architectural element is ideal for a home together with all these mounts, bays and bows; crenellations and crowns; dadoes and dormers. Not to mention …

Degnan Design Group + Degnan Design Build

… a widow’s walk.

Note that the accent is on the vertical, as in 19th-century versions. This 21st-century version, however, splits the body colour in 2: The lower floor is painted a more earthen colour that recedes, whereas the upper levels are more conspicuous. Between the conspicuous color of the next floor and the vertical cream-colored trim, the eye will be attracted up into the rooftop and skies.

Degnan Design Group + Degnan Design Build

Window frame colour plays into this home’s overall palette at an incredibly significant way. Yes, even the 19th-century homeowner had to decorate and paint and repaint the timber windows. On the other hand, the 21st-century homeowner may get brightly colored frames in different substances that will last for many, many years. We are not stuck in a world of merely white, brown or beige window frames anymore.

And just as on its 19th-century ancestors, the undersides of the home’s eaves are richly decorated with architectural information and colour.

See related

Antiques and Heirlooms Befit a 1778 Vermont Home

Artist and ceramicist Laura Zindel and her husband, Thor, fell in love with their dream house on line. The only problem: They lived 3,000 miles away in San Francisco. Nevertheless, they were in love with the historic 1778 house that they flew to Guilford, Vermont, to begin the lengthy process of its own owners. The previous owner had saved it from demolition in the 1970s, rebuilding it room by room on the weekends, also was not about to let it go to just anyone. “The construction was in great shape, but purchasing an older house is like painting the Golden Gate Bridge,” Laura says. “Start at one end, and from the time you are done, you return to the beginning and start over.”

The grand house has become part of their loved ones. “And just like a individual, we try to not judge its own defects and enjoy it for what it is,” says Laura. The first step in renovating the new member of their household was installing all-new electrical wiring, done by Thor, who’s skilled as an electrician, among many other trades. After that, they set about making the the majority of the home’s individuality.

at a Glance
Who lives here: Laura and Thorsten Zindel, and their son, Wulff
Location: Guilford, Vermont
Size: 3,500 square feet; 5 bedrooms, 1 bath
That’s interesting: This house sat to a 100-acre object of property.

Theresa Fine

A porch in the back of the house is the family’s favorite spot. Located just off the kitchen, the porch overlooks a large, manicured backyard. Thor reclaimed the home ceiling boards to reconstruct the porch’s flooring.

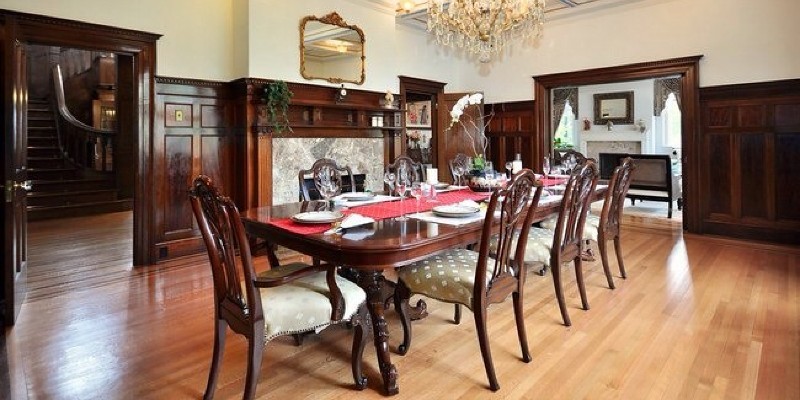
A big wood plank paired with black seats is decorated for the holidays using Laura’s ceramics, mercury glass and natural elements.

Pendant lighting: Ikea; framed artwork: Rick Jones

Theresa Fine

Is a royal-blue Amish-made hutch from Millbrook Farms Woodworks in Westmoreland, New Hampshire. It retains an array of original ceramics, made in house by Laura and her staff and decorated with art that ranges from birds to sea creatures.

Some of the jars and bottles were made using antique molds Laura has found. “My housewares are motivated by the Victorian cabinets of curiosity as well as the Arts and Crafts movement,” she says.

Theresa Fine

The formal entrance to the house was built sometime in the 1800s, as was all the house outside of the kitchen.

A sensed cent rug complements the bold blue paint in the hallway entrance. “I adore dark, saturated colours, which is a bit of a problem since our house doesn’t get a lot of light,” says Laura. “The blue in the hallway I believed was a great updated look for the house but was historically on stage.”

Paint: Naval 6244, Sherwin-Williams

Theresa Fine

A collection of portrait paintings by artist Nina Friday lines the stairway. The railing is the perfect spot for a holiday garland.

Theresa Fine

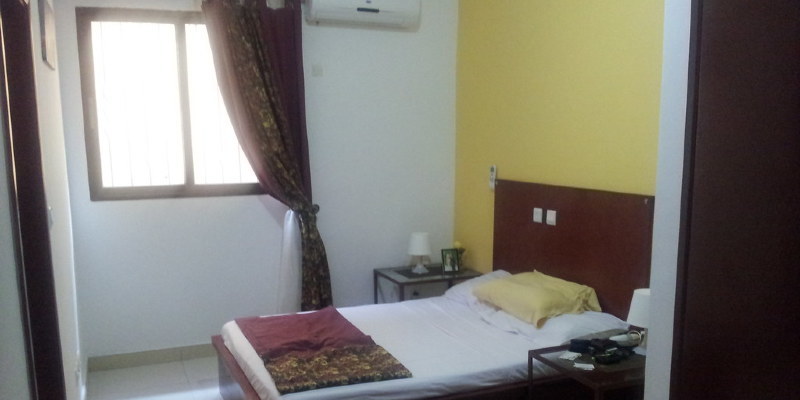
The master bedroom has gold elements to match the ebony furniture. Portraits of the men and women who lived in the house hang on every side of the mattress.

The wide pine floors, painted brown, and wallpapered walls are original to the house.

Cabinets: Coqo Floral Curtains, Natural, Anthropologie

Theresa Fine

This woodland-inspired bedding, including rabbits was part of an exclusive lineup by Patch NYC for Goal.

Theresa Fine

At the home office, painted brown trim is paired with apple-green wallpaper decorated in an English hunt club theme. A vintage globe sits on a long weathered teak desk.

Background: Lady of the Manor, Yukari Sweeney, Anthropologie

Theresa Fine

Among the two guest bedrooms upstairs has a neutral and green palette accented with pops of red. This vintage bamboo vanity chair, handed down to Laura from her aunt, was sanded a candy red.

Theresa Fine

The second guest bedroom has a much softer, more feminine palette, with painted white floors and pale pink trimming. A large, folksy felted area rug pulls the colours of this room together.

Paint: Quaint Peche 6330, Sherwin-Williams

Theresa Fine

A big antique cupboard, purchased at A Candle In The Night in Brattleboro, Vermont, displays Laura’s mother’s Depression-era quilt group.

Laura’s mother inspires her personal style the most. “She loved to collect antiques and had collections of everything from china to quilts,” Laura says. “I’ve inherited many of her treasures and also have them in our property. After we moved to Vermont from San Francisco, she explained that my style could change, and I didn’t believe her. But I discovered that if you reside in an old house, it has a voice that cannot be denied.”

Theresa Fine

A classic bureau stands out against white walls and floors, providing storage and a lovely vignette in the guest bedroom.

Theresa Fine

Another bit of artwork original to the house, a Victorian sampler, hangs above a nightstand that showcases additional vintage finds, such as a milk glass hobnail lamp perched atop an old whiskey box which once belonged to Laura’s father.

Theresa Fine

The rustic bed frame was created by Moose River Lake & Lodge Store in St. Johnsbury, Vermont. The chenille bedding is vintage.

Theresa Fine

A group of antique silver mercury glass ornaments hangs in the front windows to the holidays.

Theresa Fine

The formal entrance to the home is lit by an industrial window lighting first to the house.

Theresa Fine

“My 1778 home only feels great inside,” says Laura. “The whole house is made out of ancient wood, floor to ceiling. Maybe that’s something to do with it, or simply lots of joyful ghosts.”

A house this old includes some quirks of the past; for example, a little door used only for attracting coffins in and out. The house also offers an “Indian window” in the pantry, used for arrow strikes.

Theresa Fine

The family’s lawn can be home to well-cared-for pet hens.

Theresa Fine

Guilford is a little town near the historic town of Brattleboro. Laura’s new working studio, gallery and storefront, found here, is set in a thriving arts community.

Theresa Fine

Despite all of the treasures within, Laura (shown here) still says, “The most significant part house is my loved ones.”

See related

Top 10 Unsung Organizing Tools

In our quest for fresh, beginning-of-a-new-year, organized perfection, it’s simple to find a little carried away in the organizing or office supply store. While technical sorters and doodads surely have their purpose, more often than not they simply add more clutter to our homes. Commit to getting it right this season (and saving a bit of cash in the process) by sticking with those 10 hardworking but often overlooked helpers that are probably sitting in your house right now.

Feldman Architecture, Inc..

1. 1 calendar. It does not matter if you want a digital or paper version; the most important thing is that you stick with one calendar program, preferably for everybody in the house. Google Calendar is a great, flexible, portable option you may access from home or on the road.

Washi Masking Tape 5 bits, by mt – $14.94

2. Washi tape. Never before has this kind of small thing (tape!)) Inspired the exact same level of obsession because of this vibrant Japanese paper tape. It’s easy to tear, removes easily from most surfaces, also comes in the most stunning colors. Use it to label everything from eyeglasses at a celebration to documents, pantry jars, storage bins and more. And when you are done labeling, use it to wrap a gift, tape photos to your inspiration board or make your own wall art.

Divine Design+Build

3. A magnetic knife strip. A wall-mounted knife rack may do much more than maintain your knives tidy and out of the way (even though it’s great for that, too). Use it to arrange spices in the kitchen, tools at the garage, keys from the front door and scissors and other essentials near your desk or crafts place.

Photojojo

Instax Mini 7s and Mini 25 Instant Cameras

4. Your camera. Snap photographs of the contents of storage containers and kids’ toy bins and record them to the fronts as visual labels. Photos are also ideal for documenting oversize art projects, and that means that you are able to give up the first in good conscience.

Kate Jackson Design

5. Tote bags. The humble tote bag can do the job equally as tough as a basket or storage box, but with the additional benefit of being portable and lightweight. Use bags to sort things you store temporarily, such as library books, work materials and workout clothes.

Atypical Type A

6. Binder clips. Using these tiny workhorses only for their intended usage could be missing — you may also hang art, corral wires, keep packed products fresh from your kitchen and keep rolls of ribbon and wrapping paper from unfurling. For extra credit, upgrade your binder clips with small lengths of washi tape (see number two) and label away.

7. Zip-top bags. One of the most flexible (and cheap!) Organizing tools around, baggies may be used to store components bits all together, type things in your junk drawer, maintain toiletries neat in your bag, suspend soup level or even pipe frosting.

The Container Store

Bright Stockholm Binder – $9.99

8. Fundamental binders. Paperwork gets lost easily when piled up in baskets or piles. Use three-ring or portfolio-style binders (with plastic cuff inserts) rather to file away instruction manuals, magazine clippings and more.

Melissa Miranda Interior Design

9. A smaller filing cabinet. Have a giant filing system? You are probably saving a lot of newspapers. Make things easier on yourself by going whenever you can and making sure you need to save each paper thing that you record. Most of us can get away with one or two well-tended drawers.

See ways to take Your House office paperless

simple thoughts

10. A gifts bin. It’s 1 thing to get organized — staying organized is another issue completely. 1 tool that has the potential to keep your house tidy and clutter free is really a permanent bin dedicated to giveaways. Keep it at a central place where you are able to throw things in whenever you think of it. After the bin is full, empty it at your favourite charity store; replicate.

See related

14 Ways to Make Better Use of Bedroom Corners

A lot people have bedrooms at which we need to produce every little distance work difficult, such as the corners. Check out these ideas for corner window seats, headboards, fireplaces, armoires and press closets, workspaces, bookshelves and chaises, in addition to some interesting designs for making good use of corners in kids’ rooms, also.

Chandos Interiors

Extend an upholstered headboard. This gives the bed a stronger presence. It’s a fantastic opportunity to get more mileage out of a cloth and generate a daybed texture in the corner.

Tommy Chambers Interiors, Inc..

The idea also works with a bigger bed plus also a leather headboard.

See how to style with dual headboards

Lori Gilder

Angle the bed in. According to feng shui principles, the bed ought to be placed where you can see the door. Angling a bed to the corner may figure out this issue, providing clear views to the doorways. From a practical perspective, in addition, it allows for a surface space behind the bed for lamps, reading materials and decorative accents.

Learn more about drifting the bed into a corner

Thrifty Decor Chick

Tuck in a small fireplace. This is a cozy way to incorporate a hearth to a bedroom, and it saves a great deal of precious wall space for windows, dressers, the bed and doors.

Designs Northwest Architects, Dan Nelson

Let your bookshelves form an “L.” This is an efficient way to extend bedroom storage and display space in a bedroom that is tight. You could also nestle the bed into precisely the same corner if necessary.

Designing Solutions

Extend window treatments. This gives continuity and enlivens possibly dead space with fabric and prints.

Denise DeCoster Architect

Insert a work nook. We’ve debated whether or not a desk is a restful item to have in the bedroom, but for many it’s a matter of necessity. The corner is a discreet spot that can help keep your relaxation and work spaces different. You can also use this idea for a dressing table; just add a costume mirror.

Tracery Interiors

Produce a reading nook. Put a chaise or overstuffed armchair in the corner that has a great lamp for settling in with a book or that pile of catalogs that have been calling your name.

Cravotta Interiors

If your space is tight, then look into corner seats for a comfortable fit.

You can also use two seats to make a spot for conversation and coffee. It can be a great refuge where parents may connect from the kids.

Griffin Enright Architects

Open that sucker up. OK, OK, I admit, this really is a dream-house scenario in a mosquitoless part of earth, but wow, this treehouse-like bedroom plus its own spacious corner are a damn great fantasy.

Zinc Art + Interiors

Nestle an armoire in. Based on how it relates to a mattress’s placement, this may also be an excellent spot for concealing a bedroom TV.

Alicia Ventura Interior Design

Get creative using a wall mural. This clever tree incorporates bookshelves on two walls.

Twist Interior Design

Conjure a special spot for curling upward. Bookshelves and an oversize ottoman create a wonderful kid-size nook. Note the way in which the designer has included a roof across the very top of this built-in. The same idea could be executed with beanbags on the floor and fabric across the top.

Carlyn And Company Interiors + Design

Put two single beds head to head. This bed setup is excellent for kids’ sleepovers.

Flea Market Sunday

Similarly, you might have the two beds back up to some shared nightstand.

More: Desire tips for taking advantage of corners in other rooms? Check out corners in the kitchen, corners in the house office and corners at the living room and family room.

See related

Copyright h o m e s t a y b e i j i n g 2 0 0 8 2024