The best way to Plant a Potted Peony

Garden facilities generally promote peony crops that are potted in the spring. Peonies develop in to plants that are bushy with 6 inch diameter blossoms. Space this perennial in accordance with its size, about 36-inches broad and tall. These plants stay longer when planted in fall or the spring, preferably in the floor.

Pick an area . Look for a guarded location to avoid wind damage to the crops. Select an area from shrubs and tree roots, as competitors for nutrients and moisture causes a reduction in flower size.

Dig a hole using a shovel twice as broad as the potted peony’s root ball and 18-inches deep. Break dirt clods up using the fringe of of the shovel. Mix a-2-inch layer of compost to the soil removed in the hole.

Place 2″ of soilandcompost mixture in the base of the hole. Mix 1/2 cup of bone meal with the soil in the bottom of the hole to supply a supply of slow release nutrients for the peony . that is plant

Tilt the plant and squeeze the sides of the plant pot to loosen the root ball. Pull the peony. Add enough soil in the hole to spot the very top of the root ball at ground-level. Place the root ball and fill the region round the root ball. Plant peony crops that are other 48-inches away.

Spread a 1/2 inch layer of compost throughout the root location. Cover the layer with 2″ of an organic mulch like bark. This decreases the development of weeds and keeps the soil moist underneath. Soak the soil with water before the roots are moist.

See related

The best way to Grow a Cactus

Unlike their desert cousins, the leaflet-kind vacation cactus prefers moister soil and cooler temperatures. These cactuses create stems that really consist of leaflets that are segmented. Most have spines that are minimum however they do function flowers in spring, winter or fall, with respect to the range, making them a remarkable addition to your own indoor space. You never need a green thumb to effectively begin a plant from the leaf of a current cactus in the event that you would like to include more cactuses for your collection.

Examine the plant in late spring for development. Using a knife, cut off a stem containing three leaf segments that are new.

Lay the cutting on a paper-towel in a place away from sunlight. Allow the cut end of the section to dry for 24 to 48 hrs. Drying the cut stops illness and rot throughout the rooting procedure.

Fill a 4 inch diameter pot using a sterile, well-drained potting mixture. Use a pot that’s at least one drainage hole. Water the mix until moisture drips from the blend as well as the hole is moist.

Insert the cut end of the cutting 1 inch to the mix. It’s possible for you to plant as much as three cuttings in a 4 inch pot.

Two wood skewers to the soil on reverse sides of the pot. Place a plastic bag on the very top of the pot. While retaining moisture throughout the rooting procedure the skewers stop the bag from touching the cuttings.

Set the pot in a area where the cuttings can obtain sunlight, as direct sun can burn up the cactus leaves that were unrooted. Remove the bag and water the soil if since this can trigger the cuttings, it starts to dry in this period, however don’t over-water.

Remove the bag when the root, which usually requires three to eight months. When new development commences on the cuttings rooting is obvious.

See related

How To Power Wash A Walkway

Every homeowner needs to make sure their walkway is clean. Power washing the walkway is not a hard task. With a few DIY tips, you can do this on your own without any challenges concerning cleaning service Tuscaloosa. This is a task that should take no more than half a day from preparation to the end of the maid service Tuscaloosa AL.

Tools And Equipment

For this task, you will need the following tools and equipment:

– Leaf blower or a broom
– Nozzle pressure washer
– Sandblaster attachment
– Detergent
– Protective gear for the eyes
– Gloves

Preparation

– Remove any obstacles in the walkway and the adjacent area.
– Blow or sweep away all the loose debris
– Spray clean fresh water on the vegetation around
– To prevent damage, cover the flowers and shrubs
– Before power washing, test the cleaning products on a small section of the walkway

Tips

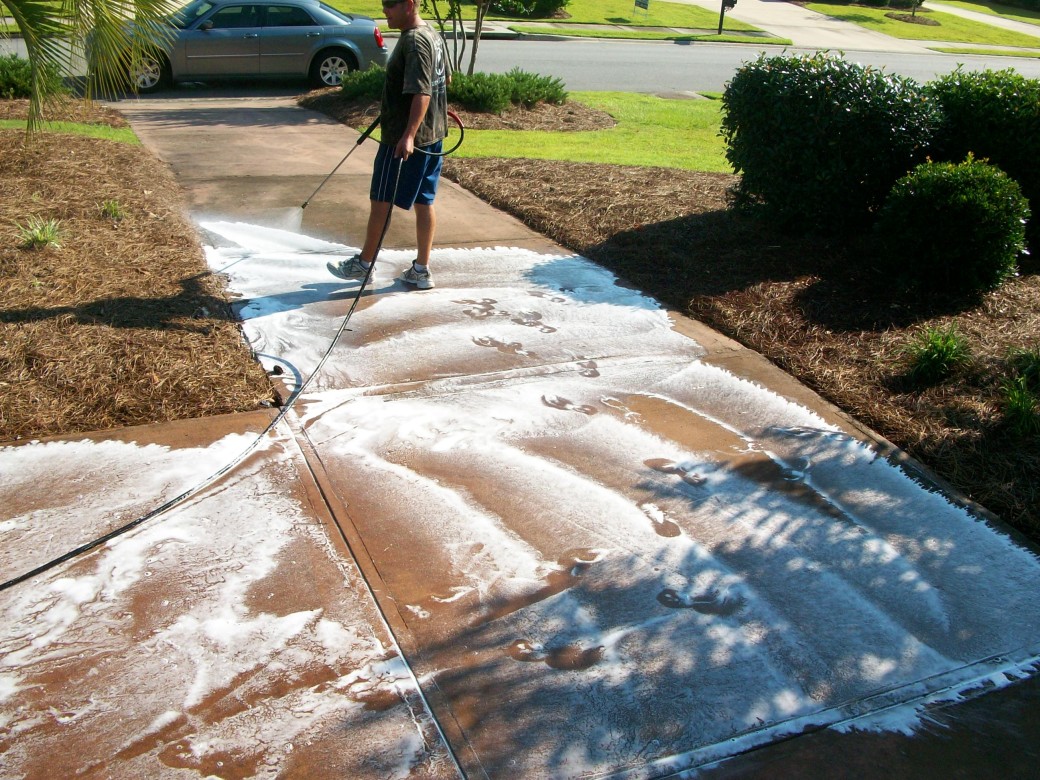
Pressure washing is an effective way of cleaning the walkway. When done properly, your old grimy stone walk, paver or concrete will look as good as new. It’s very effective to have cleaning services Tuscaloosa AL.

While power washing is highly effective, you should not use it on laminar sandstone. The pressure can cause damage to the surface.

For your home, you should use electric power washers of no less than 1000 PSI. In case your washer is gas powered, it should be no less than 2000 PSI. Gas powered washers are ideal if you need a mobile cleaning option.

If your walkway has been stained by contaminants that are difficult to remove like paint, you should use a washer with a relatively higher pressure. For optimal cleaning results, make sure the washer has a spray pattern of 40 inches.

Never undertake any cleaning job without having your protective gear on. You will open yourself to a lot of risks.

Turn off the pressure washer when you are not using it. Leaving it unattended is a recipe for disaster. While in use, do not point the nozzle at any person or animal. Do not even point it at your car or house.

Imprinted and stenciled walkways should never be pressure washed. The pressure from the nozzle can damage the patterns.

Cleaning

– Evenly apply detergent to the cleaning surface and then prepare the nozzle.
– Allow the detergent to sit for 5-10 minutes
– Using a 40-inch spray, set the nozzle on high setting
– Only use the nozzle at the right distance from the walkway

Tips

In case you are using a washer rated lower than 2000 PSI, make sure the nozzle is no more than 1 foot from the cleaning surface. 1-2 feet is ideal in case your washer is rated between 2000 and 3000 PSI. If you are using a washer that’s higher than 3000 PSI, it should be no less than 2 feet from the cleaning surface.

While washing the walkway, go one section at a time. In case any section has a lot of soil, you will have to pass the sandblaster over it, especially if you have baking soda attachment. If you are considering to coat or seal the walkway after cleaning, allow it to settle for up to 48 hours.

The best way to Raise Cilantro

An herb garden puts fresh ingredients to your recipes within several steps of the kitchen door if spice is the concept of your philosophy. Herbs are fairly simple to develop in patio pots or in floor. Cilantro (coriandrum sativum) is an herb that resembles flat-leaf parsley, but has a distinctive fragrant and spicy punch in its leaves. When cilantro goes to seed, the seeds are harvested for re-planting or coriander, as well as the flowers may be added to other dishes or salads, creating an herb of skills that were multi-tasking. Cilantro thrives in cooler climate and is perfect for planting early in the spring, even in hotter places of the region like U.S. Department of Agriculture’s planting zone 9 and above.

Clear a garden place to plant cilantro seeds following the last frost. An area by your do or that receives considerable sunlight – at least six hours — is perfect for simple harvesting. If you don’t have the best location, cilantro grows beautifully in a shallow, broad container that sits in a sunny window or on an outdoor patio.

Pull on gloves and dig a row about 10″ deep and about 24-inches long. Transfer the soil to bucket or a pot. Compost – garden soil to the pot so the combination is one-half-indigenous soil to one-half mix and backyard soil. Return the soil that is blended . In case you choose to plant cilantro merely include a nutrient-rich potting soil over a 1-inch layer of broken pottery shards or pea-gravel. Cilantro has long tap roots and doesn’t like damp toes, producing well-draining soil needed for for healthy crops.

Poke a hole about 1/2 inch deep to the eraser end of a pencil or the soil using a chopstick. Poke holes that are extra 2″ apart.

Place a seed in every hole and mound the holes with soil that is displaced. Cilantro grows not transplants and best from seed.

Water the seeds using a watering can, using care to not disturb them. A can with a shower nozzle is perfect for herb planting therefore it doesn’t water log freshly planted seeds or seedlings. It will take cilantro seeds about 10 to 2 weeks to sprout.

Pinch straight back the seedlings when they’re 2″ large therefore they develop about 6 to 8″ aside.

Water your cilantro about 1-inch every week; in reality, cilantro is more fragrant if you don’t over-water it.

Clip the newer cilantro leaves when the plant matures to one foot tall for cooking. Clipping will ensure progress. Every time you require cilantro, select an alternative area of the plant for clipping.

The best way to Control the Splash of a Backyard Fountain

A fountain in a well-manicured backyard becomes the crowning jewel of the outside charm of a home’s. Install a geyser-type fountain with continual splashing as well as your yard will possess a theme park sense. This focal level that is normal sets the tone for the entire lawn, therefore it’s essential to restrict splashing. When a fountain splashes also much, you risk using up up your pump — an error that is pricey. Create water stream and the best sound by modifying the fountain or pump.

The fountain is level. An fountain could be indicated by splashing. Place an amount on the edge of the fountain. Look in the level bubble. The bubble will rest in the middle of the liquid. Too significantly to right or the left and you also need to level the fountain out. Remove the fountain and level the floor under it. Clear away any hurdles that could make the fountain relaxation crooked. Reposition the fountain before the level signifies evenness.

Check the water level. Fountains with too much or not enough water will splash. Turn the fountain off and permit the water to cease flowing. Look in the water-level. The water needs to be more or half-full, but not greater than 1 1/2 inches from Add or remove water, then start the fountain.

Place a bit of display in the base of the fountain basin. Waterfall design fountains can splash upwards but the return movement will be limited by a display. Center a display in the bottom to avoid the up-splash.

Turn the fountain pump off. Place your hand on along side it of the pump and sense for the get a handle on dial. It might possess timer or a slide wheel manage sort get a grip on. By controlling the pressure of the fountain adjust the splash. Turn the wheel turnon the pump. Look in the fountain. Before you’ve minimum splashing continue to change the wheel.

Place rocks that are sleek in the underside of the fountain to avoid splashing. It diffuses the splashing when water hits the rocks.

See related

The best way to Install Shades on Fiber Glass Doors

Shades and blinds for fiber glass doors are getting a frequent addition. The marketing feature of the shades contain a shade that can not shift when the door has no cords, opens and is behind glass, which which will keep it clear. The advantage of the type of shade is that it’s going to fit over your current fiber glass trim molding with no modification. This makes it simple to to use and simple to install.

Measure the dimensions of your glass part of your fiber glass door. Measure all of the solution to the exterior of your trim. Purchase your shade that is enclosed to to match these measurements.

Unscrew the top-five screws on the molding. There’ll be two close to the top on every side and three over the top. Slide the best brackets for the shade supporting the molding centered on the measurements on the packaging. You can find brackets for every side. Screw the five screws back to the molding.

Hang the shade in the very best brackets. You’ll see two metal tabs that jut out of the shade frame close to the base of the body. Mark the area of all the tabs on the door using a pencil. Remove the shade.

Unscrew the screws close to your mark. Insert the l shaped bracket underneath the molding in the place that is marked. Repeat for the 2nd side. Screw the molding back. Place the shade on the most effective brackets. Lshaped the shade body flush to the do-or and try to press the steel the tab down over lshaped bracket. In case the bracket is somewhat off, faucet it having a hammer down or up till it is possible to lock it. Repeat for the 2nd side.

See related

Copyright h o m e s t a y b e i j i n g 2 0 0 8 2024