Blackberry Bush vs. Poison Ivy

Poison ivy (Toxicodendron radicans) and blackberry (Rubus spp.) May resemble each other at first glance, but just poison ivy contains urushiol. This chemical, which can be from the plant’s sap, which can cause severe itching, an inflamed rash and blistering after it contacts human skin. Blackberry, on the other hand, provides healthful fruits, even in the wild. Poison ivy is hardy at U.S. Department of Agriculture plant hardiness zones 3 through 10; blackberry species’ hardiness ranges vary, with Rubus fruticosus hardy in USDA zones 5 through 10. So poison ivy and blackberry share a few locations. 1 common expression, “Leaves of three, let it be,” often, but not always, holds true if differentiating poison ivy plants from blackberry plants.

Tell-Tale Leaves

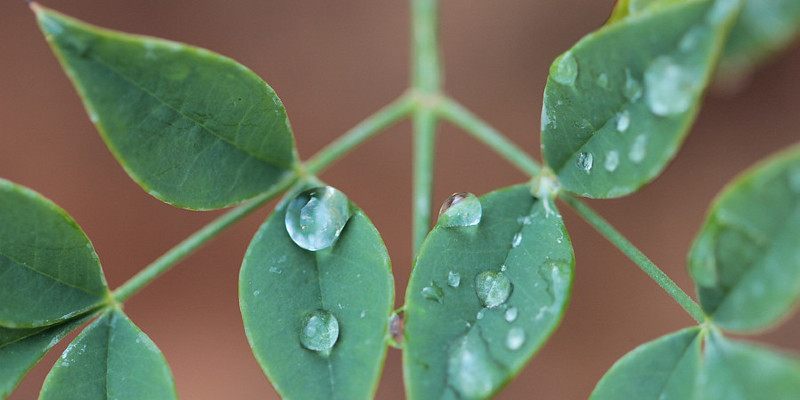
Examine the leaves to help distinguish a blackberry bush from poison ivy. Both plants’ leaves develop in a three-leaf design originally, however, as a blackberry bush rises, all its two bottom leaves split into two leaves, leading to a five-leaf cluster. In terms of colour, poison ivy leaves are green while the bottom of blackberry leaves are light green to greenish-white. If the leaves are wrinkly, it’s a blackberry bush. Poison ivy leaves are smooth. Also, some blackberry species possess serrated leaves while poison ivy doesn’t, though some poison ivy leaves are notched.

A Thorny Situation

Should you see thorns or spines on the plant’s stems, then you are likely considering a blackberry bush. Poison ivy doesn’t sport thorns. Thornless types of blackberries exist, nevertheless. So don’t rely solely on thorns to distinguish poison ivy out of blackberry.

Berries of a Different Colour

The ripe fruits of a blackberry bush are dark, ranging from purplish-black to black, and the unripe berries may be red. Poison ivy additionally has berries, but they’re light green when young and grayish-white, white or cream when mature. Blackberry fruits are aggregates, meaning each “berry” is composed of a number of individual fruits which form a single cluster, or berry. Poison ivy has sole berries.

Growth Habit

An elastic plant, poison ivy has a number of growth habits. It can develop as a woody shrub, a creeper that spreads across the floor and as a climbing vine. Blackberry bushes form dense thickets, or brambles, in the wild. When blackberry bushes are elongated, their canes can be erect, semi-erect or trailing.

See related

Can I Prune Lavender Bushes in February?

Whether you’re using your lavender (Lavandula) crops for exotic cooking, for aromatic oils, or merely for their pleasant scent around your garden, sooner or later, your plants are going to want some cutting back. But February is typically a time when your lavender plants are in their dormant stage, and therefore, it’s not exactly the best time for pruning.

When to Prune

The best times to prune your lavender plants is during the new-growth stage during the first spring, or after they have flowered. The University of California Division of Agriculture and Natural Resources recommends pruning after the plants have flowered in the summertime, while Colorado State University’s Extension service recommends doing it as the green leaves begin to come out in the spring. A spring pruning will remove any dead or unattractive old growth and permit new growth to thrive, even though a summer pruning can encourage further summer blooming. Another benefit of pruning after flowering: you’ll get to utilize those attractive, pleasant-smelling flowers in sachets or in bouquets. Whatever you choose — or whether you choose the two options — it needs to be apparent that February is somewhat too early — or somewhat too late — to get ideal pruning.

Frost-Hardy Lavender

If you’re developing a frost-hardy variety of the plant, such as English lavender (Lavendula angustifolia), hardy from U.S. Department of Agriculture plant hardiness zones 5 to 8, or lavandin, (Lavendula x intermedia), hardy from USDA zones 5 to 9, a hybrid of Lavendula latifolia and Lavendula angustifolia, you might discover that it blooms more than once annually. If you’re choosing the summer-pruning choice, the best course is to prune right after the flowers bloom, suggests the U.K.’s Downderry Nursery. The nursery specialists there urge pruning back to a plant height of about 9 inches, leaving a few small shoots intact, and then continuing to cut fresh flowers as they bloom.

Other Varieties

Other varieties of lavender are far less cold tolerant, such as Spanish lavender (Lavandula stoechas), hardy from USDA zones 7 to 10, and French lavender (Lavendula dentata) hardy from USDA zones 8 to 11. These types may bloom only once. Prune them in the summer after flowering, recommends the Downderry Nursery, and leave several blooms intact to permit for new growth, as you would with the other more frost-hardy varieties. If you decide to prune them in spring, do it when new growth starts, cutting away any old growth, avoiding cutting into the woody stems, and departing the new growth intact.

Pruning Safely

Whether you’re pruning just before the end of the dormancy period in spring or you’re doing it after your lavender flowers, it’s always a good idea to practice decent pruning hygiene. To put it differently, be certain that you’re cleaning your pruning clippers and shears so as to avoid spreading diseases from plant to plant and season to date. Brush off any loose dirt, and then soak the resources in a solution of one part bleach to three parts water, which indicates the University of Florida IFAS Extension.

See related

The Best Floors for Wheelchair Use in Homes

The American with Disabilities Act makes three recommendations for the sort of flooring you must utilize to generate a room wheelchair accessible. Your flooring material needs to have a coefficient of friction of about 0.5; you should avoid high transitions; and carpeting must be firmly connected to the subfloor and have a pile less than 1/2-inch high. Durability is also an issue; wheelchairs are heavy and can quickly wear down some ground coverings.

Non-Slip Floors

The coefficient of friction is a measure of the sum of frictional resistance of a flooring materiall in other words, it is a measure of this substance’s slipperiness. Possible values range from from 0 to 1: The reduced the value; the more lustrous the flooring. Floor materials with a coefficient of friction in the area of 0.5 are deemed slip-resistant. These include these options as hardwood, a few kinds of ceramic tile, sheet vinyl with an embossed surface, luxury vinyl tiles and laminate flooring planks. Thin-pile carpets can also be slip-resistant, but thick carpets are tough to navigate in a wheelchair — they have a coefficient of friction greater than 0.5 — and should be avoided.

Hardwood and Laminates

Hardwood floors are not merely ADA-compliant, but attractive as well, but you should pay attention to the hardness of the wood you select. Softwoods, such as pine and fir, dent easily, while hardwoods with a high Janka rating, such as maple, hickory or virtually any exotic species, should withstand the bumps and grinds of regular wheelchair traffic better. Factory-finishes are harder and less likely to sustain damage than onsite applications. Laminate flooring has a similar overall look and also a factory-finished surface hard enough to withstand dents. Scuff marks come off easily with very little danger of ruining the finish.

Ceramic Tiles

Ceramic tiles are more water-resistant than hardwood or laminates and are a much better choice for the kitchen or bathroom. The perfect tile dimension is 2 inches square. Larger tiles are more fragile and likely to crack under the weight of a wheelchair, while flooring with smaller tiles are filled with grout lines which scuff easily and are difficult to wash. If the ground has 2-inch tiles, nevertheless, there are enough grout lines to boost traction. This is an important safety concern both for wheelchair-bound people and professionals when moving from the seat to the shower.

Vinyl and Carpeting

Vinyl is a water-resistant choice for kitchens and bathrooms which is cheaper to buy and easier to install, however inlaid sheet vinyl and vinyl tiles are more inclined to be slip-resistant enough to function as ADA-compliant. Luxurious vinyl tiles are another non-slip option; they have a foam backing that gives them a cushiony sense, and they install such as laminate flooring boards. If you must have carpet, the maximum allowable pile length is 1/2 inch, but you should keep it shorter than that to make propelling the wheelchair simpler. It is best to set up the carpet without a financing, and it must be firmly attached to the subfloor.

See related

What Is the Garden Gourmet Backyard Composter?

The Garden Gourmet Backyard Composter is a self centered composting system which makes it much easier to recycle your garden and kitchen waste. It features the home gardener some advantages over loose composting and above homemade composting bins. One such advantage is size. The Garden Gourmet is very compact, so it lets those with very limited yard space take advantage of composting. It also maintains the compost neatly contained and out of sight.

Basic Physical Description

The Garden Gourmet Backyard Composter bin is just a black plastic container which can hold 11 cubic feet of compost or even scraps. It’s 36 inches high and 24 inches square. It has adjustable air vents on the sides and a hinged lid on top that snaps securely in place to keep compost in and inquisitive pests like raccoons and opossums out. The empty container weighs 29 pounds and arrives unassembled, but it is easily put together without the need for some tools. Those that like recycling will appreciate this bin is constructed from about 51 percent recycled products.

Rodent Protection

One important feature to note about the Garden Gourmet bin is it is available at the bottom to permit liquids to escape. This usually means your compost sits right on the ground. While this might not be a issue, it’s also possible that mice, rats and other sorts of rodents may find their way into your bin. To keep them out, place a display under the composter before you fill it up. This will allow liquids to drain out and prevent rodents from getting in.

Using the Composter

The Garden Gourmet composter is a very simple system. All you want to do would be to open the lid, then toss your scraps in, close the lid and wait, but you should be aware it can take up to two years to complete the composting process. Should you use a shovel or a spade to turn the compost inside the container you can cut that down to as small as three months. Composting also works great if you include a mix of substances, like leaves, grass clippings and kitchen scraps, and chop or shred things before placing them at the composter.

Harvesting Your Compost

When your compost is ready it will be brown and have the look and feel of rich garden soil. The Garden Gourmet is intended to enable you to leave the upper layers of compost hovering while you crop the finished merchandise. It has a door in the bottom that opens, enabling you to scoop out the finished compost and then leave the rest to drop down and fill in where the finished compost was. Once you have eliminated the compost, close and latch the door and the composting process will last for everything which remains in the bin.

See related

How to Troubleshoot a Kenmore Electric Smooth-Top Range

An electric range with a glass top is easier to wash than a range with traditional coil burners and has a sleek look. Kenmore makes a variety of smooth-top electrical ranges that, like all appliances, can fail to function correctly under certain circumstances. Some issues need professional aid to remedy, but you ought to troubleshoot issues that are fundamental yourself apparent issues may be rectified without a service call, so you’re back to cooking as possible.

Entire Range Will Not Operate

If not one of the purposes of your range will function, ensure that its power cord is plugged into the socket. There may be an issue with the power supply to the appliance analyze the fuse box or circuit breaker of your home. Replace any blown fuses or reset the circuit breaker if necessary. When there is adequate power for your scope but it will not turn on, its support wiring could be incomplete. Contact Kenmore at the amount listed in your owner’s manual for aid. It will not function and if you’re currently attempting to use the oven part of your range, make sure that the time is put on the display clock. When the clock hasn’t been set the oven will not turn on.

Cooktop Element Does Not Heat

If the components aren’t heating evenly or on your cooktop will not heat, check that you have turned the control knob . The components may seem not to heat or might appear to heat unevenly if cookware that is improper is utilized. Avoid warped or lightweight pans that don’t distribute heat evenly. Elect for apartment, even, moderate – or heavy-weight pans and pots, which heat so food is not likely to burn.

Abrasions on Cooktop Surface

If you discover marks they may be scratches or abrasions from food particles that get trapped between the surface and your cookware. Benefits that are cooking don’t affect and fade over time, but you can avoid them. In case you don’t use the cleaning products to clean it abrasions can look in the surface of your cooktop. Pick a cleanser designed for ceramic-glass cooktops and buff it with a nonabrasive sponge or cloth. It might be caused by food that has boiled over and been cooked through ingestion on the glass if your cooktop has discoloration. A razor blade scraper can remove the debris. Facial residue from food and water may discolor your cooktop surface. Utilize a suitable cleaning product to remove them.

Range Is Not Level

Examine the floor under it to ensure that it is level and stable enough to support the appliance if your range does not appear level. Get in touch with a carpenter or contractor if you notice it’s sagging or sloping, to fortify the flooring. Your scope might not be level if it was poorly installed. Set a rack at the middle of the oven and set a level on it. Adjust the leveling legs at the bottom of the range until the level indicates the problem was corrected. Bear in mind that the positioning of your own kitchen cabinets may make the range look like it is not level. Cabinets should be square and allow clearance for the range.

See related

What's a Wenge Veneer?

Wenge is a African hardwood that is dark enough to be a substitute for ebony. The tree that generates wood that is wenge — Millettia laurentii — has been highly exploited as a raw material for flooring, paneling and furniture, and is considered endangered. For this reason logs are cut into thin strips. These are glued to a plywood or softwood substrate to generate plywood, tables, cabinets and other furniture pieces.

Wenge Characteristics

Wenge has a Janka hardness rating of 1630 — some resources estimate it higher — but it is about half as tough that are just two species it resembles. It is an more easy wood to operate. Saw blades are worn down by it and it is difficult to sand, because the grain is textured. To working together with wenge A disadvantage is that it splinters readily, and splinters under your skin can get infected. Despite these issues, it is an attractive hardwood at a rustic type of way.

Preparing Logs for Veneering

Logs of a mature Millettia laurentii tree can reach diameters of 36 inches, and while that’s more than enough to mill lumber of any dimension, it generates a large quantity of veneer. Worker produce veneers by soaking them to guarantee slicing and cutting logs into lengths. Within an hour of removing them the logs are sliced by employees to dentures using one of many methods. The traits of each log are evaluated by them before determining how to slice it to make the most of its grain pattern and uniformity.

Types of Veneers

Flat-slice veneers are produced from a log in a variety of ways, and each method produces a characteristic design. Veneers produced this way would be the raw materials for engineered flooring planks and a few types of timber paneling, among other applications. It is also possible to roll-slice veneer by turning the back above a blade. Thin veneer sheets that could possibly be turned in to plywood or sold as a commodity are produced by this method. In the latter case, veneer suppliers sometime subdivide the sheets, apply glue along with a backing and market them.

Caring for Wenge Veneer

Wenge is a durable wood species, so you don’t need to give some particular attention to it, in case you have a bit of furniture created with veneer. It’s often best to leave unfinished or to shield it or two coats of oil, As it is a challenging material to sand, and because sanding can be somewhat poisonous. If you want the look of a surface finish, use a couple of coats of shellac or lacquer to present a subtle sheen that lacks the plasticity of polyurethane.

See related

Husqvarna Trimmer Line Setup

Husqvarna manufactures 15 series heads that are different and 18 string trimmer models. Whichever trimmer version you’re using — and which is set up — you’ll have to replace the line. You should utilize this diameter recommended for trimmer design and your own head; line that’s too big will bind and might overwork the search motor. This advice is supplied by your owner’s manual — you may download a copy, if you do not have one.

Disengage the spark plug boot so you have access and place a level surface with the Husqvarna trimmer.

Depress the tabs on the sides of the rim and grasp the head, then pull the cap off and eliminate the spool.

Take out all the line and wash inside and the spool of the head. Cut a length of microfilament line from a roll, with a tape measure to assess the length plus also a pair of scissors to cut it. Determine the dimensions and duration of line you need in the manual of the owner.

Hold this line’s two ends together with one hand while you discover this line with the other’s middle. Twist the centre onto the notch in the hub of this spool.

Wind the 2 lines around the spool at the direction of this arrow imprinted on the bottom. The spool is split into two sections; keep the lines in their respective section each. Avoid crossing a line over the line in another section or over itself.

Quit when 6 inches have been abandoned at the conclusion of every line twisting. Twist the line nearer to the top of the spool in one of the notches on the rim, then hook the second line to the contrary top notch. The line has to cross on top of the first to make the connection.

Put the spool back in the cap and feed the lines through the notches at the face of the cap. Until it snaps into place by pushing down on it, replace the cap on the series head. Reconnect the spark plug wire.

See related

How to Know Bush Squash Out Of Vine Squash

Squashes, including butternut, acorn and spaghetti, make a tasty addition to snacks that are sweet and foods. Squashes have a tendency to grow on bushes or on climbing vines. All summer months, such as zucchini and crookneck, grow on bushes that are non-vining. Even though some varieties have a bushing habit winter squashes are inclined to grow vines. It’s hard to tell whether a squash seedling will develop into a bush-type or a vine-type just. Seed packs and plant maintenance tags contain the info you need to determine the plant’s growth habit. As they grow also, watching the squashes lets you know whether the crops are bushes or vines.

Start looking for the words”summer” or”winter” on the plant’s care label or seed packet. It grows on a bush if the plant is a summer squash.

If the plant is a winter squash determine the number. For instance, the”Table Queen” number of acorn squash grows on vines, while the”Table King” and”Cream of the Crop” varieties grow on bushes. Most butternuts grow on vines, but the”Ponca” variety has a semi-bushing habit.

Because it grows, watch the plant. Vine-type squashes develop long vines that can grow between 10 and 20 ft in length. Bush-type squashes possess a more compact look.

Put supporting or around. The trellis wills climb. Bush types will not.

Have a look at the rind of the fruit. Summer squashes mainly have a rind, while winter, squashes that are vine-type have a tendency to have a thick rind.

See related

Copyright h o m e s t a y b e i j i n g 2 0 0 8 2024