The way to Reduce the Slope of Your Yard

Some of the most common reasons a homeowner might want to reduce the slope of a yard include the organization of a new yard and preventing excessive water runoff. Not only does storm runoff usually not make it to landscape plants’ roots, but it ends up filling municipal storm sewers or runs into waterways. This runoff brings with it sediment, chemicals and other pollutants. The perfect grade drops 6 inches above 10 feet. While the procedure for reducing the slope isn’t difficult, it does require the assistance of an assistant.

Put the 2-by-4, on its side, on the soil beside the home, pointing toward the space in which you want water to drain.

Place the carpenter’s level on top of the 2-by-4, in the center.

Lift the end of the board farthest in the home while your assistant watches the Navy’s level and tells you when it registers level.

Use a measuring tape to find out the distance between the surface of the board and the ground’s surface. Raise or lower the board before the distance measures 6 inches.

Hold the board while your assistant drives a wooden stake into the dirt at the end of the board. Use a pencil to mark the area where the surface of the board meets the wager. Eliminate the plank, and place it aside.

Add soil close to the foundation, spreading it with a grading rake, toward the bet until you have 6 inches of distance between the pencil mark on the bet as well as the surface of the dirt. You may want to repeatedly add dirt, raking it in a gentle downward slope till you achieve the proper distance between the dirt and the pencil mark on the wager.

Continue the procedure every 3 feet around your home.

See related

The finest Hardy Perennials

A perennial is a plant that lives three or more years, and a hardy plant survives and thrives inside a specific area, but the best rugged perennials do more than merely live long and flourish. They prosper in many locations, adapt quickly to the neighborhood surroundings and create dramatic blooms over handsome foliage — all with a minimum of maintenance and attention.

Lavender

The quintessential plant of this Provencal or Mediterranean garden, lavender’s long-lasting spikes of tiny flowers lend grace to perennial gardens. Drought-tolerant, sun- loving lavender fills places where other plants may whither. English lavender (Lavandula angustifolia) is the option of perfume chefs and producers. It grows to about 2 feet tall with gray-green leaves, and blossoms in whites, pinks and purple; “Munstead” and “Hidcote” varieties are widely available. Spanish lavender (L.stoechas) grows to 3 feet using silver gray leaves topped with purple to purple flowers from spring to mid-summer. A third type of lavender, lavendin (L. x intermedia), branches freely, growing into 2- to 3-foot plants that can be utilized as a low-growing hedge.

Daylilies

Once considered weeds fit only for roadside ditches, tawny daylilies (Hemerocallis fulva) gained respectability due to the efforts of geneticists like Arlow Burdett Stout, along with an army of enthusiastic breeders and hobbyists. A rainbow of colors and colorations grow across wide ranges, such as U.S. Department of Agriculture plant hardiness zones 8 through 10. Grassy foliage grows throughout the growing season, renewing the plant’s appearance throughout the season. An range of hybrids creates a long succession of bloom. In a Mediterranean climate, some plants rebloom on semi-evergreen plants. Daylilies blossom best with four to six hours of morning sun, but many grow happily in dappled shade or full sun, making them equally at home in a cottage garden as ground retainers on a hillside. Favorite magnets of American Hemerocallis Society West Coast members comprise “Bill Norris,” “Point of View” and “Star of India.”

Lilies

True lilies (Lilium spp.) Start blooming after the daffodils fade in spring and blossom direct through autumn. Early Asiatic hybrids return to Oriental hybrids and regal trumpet hybrids. Several species lilies, such as Columbian lily (L. columbianum), Humboldt lily (L. humboldtii) along with California’s native leopard lily (L. pardalinum), which flowers from May to June, are at home in woodland and native gardens. Hybrid lilies thrive in full sun, although some native species favor woodland-edge exposures. Lilies also reproduce prolifically. A colony of three to five bulbs will grow into a thicket of stalks topped by heaps of blossoms within five decades, supplying more lilies for the garden.

Shrub Roses

Newer shrub roses (Rosa spp.) Have been bred to be much more disease-resistant and self-cleaning than the long-stemmed hybrid tea roses of decades ago that need constant pruning and spraying. “Sally Holmes,” a tree rose that can grow into a sizable hedge on a land line, produces big clusters of white flowers with salmon highlights, along with Graham Thomas along with other David Austin English roses grow big, full flowers (Graham Thomas is yellow) on big floribunda shrubs. Shrub roses bloom continuously; plant them in December or January for a complete year of blossom.

See related

How to Keep Paver Walkway Grass

Paver stone walkways generally require a gravel and sand base layer with small gaps between each paver. If you prefer a more casual walkway, however, you can lay large garnish with broader spacing to create a stepping stone walkway that allows you to keep the grass between each paver. If you set the pavers into the dirt, you can mow directly over the paver path, with no need for time-consuming weed trimming equipment. This project works best with big, 12- to- 16-inch pavers. Choose from natural stone pavers, such as granite, concrete or thin flagstone.

Mow the grass prior to installing the walkway to make it simpler to access the sides of the pavers.

Put two garden hoses on the ground to define the exterior borders of the walkway. There is not any requirement to transfer the outline to the grass using spray paint.

Measure the paver thickness so that you know how deep to set the pavers in the soil.

Put the scoop in the desired design between the two garden hoses. Use a measuring tape to ensure equal spacing between each paver. Leave enough space between each paver so you can keep grass between the pavers, but brief enough that you can easily measure from one paver to another without taking a very long stride, normally between 4 and 6 inches. Leave a narrower gap, if needed, if two or more pavers are placed side.

Cut into the soil around each paver using a backyard knife or half-moon edger.

Remove the pavers, then cut into the soil as deep as the paver thickness, and about 2 inches for the foundation. Remove the turf and dirt from inside the room with a garden trowel or flat shovel. Cut carefully to just eliminate the grass in which the pavers will go, which means you’re able to continue to keep the grass between pavers.

Pack the dirt with a hand tamper to prevent the pavers from shifting as the soil settles.

Mix stone dust to the same consistency as pancake batter, then add 2 inches of the stone dust mixture to the underside of every paver hole.

Set the paver in place over the stone mud bed. Tap the top of the paver using a rubber mallet to eliminate air bubbles from the stone dust mixture and also to set them so that they are even with the top of the ground. Tilt one side of each paver slightly to allow water to run off instead of pooling together with the pavers.

Pack the dirt tight around the borders of every paver to prevent the pavers from shifting sideways.

See related

Landscaping: How to Remove Briars & Vines

Briar patches are thickets comprised of the overgrowth of plants, like blackberry or raspberry shrubs, which are both unsightly and potentially harmful due to their thorny vines. Frequent vines that prove troublesome to the landscape contain wild grapevines and ivy, with both becoming intrusive, invasive and detracting from the appearance of other plant life. Although tedious, based on the amount of growth, briar and vine removal is an issue of eliminating them in the source and following up with a chemical herbicide.

Ivy Vines

Sever that the ivy vines 5 feet up from the ground with bypass pruners or lopping shears.

Grasp an ivy vine and pull it up from the ground. Cut the vine with lopping shears or bypass pruners 12 inches from the base. Put the cut vines aside in a stack. Repeat with the other vines.

Dig around the base of the vines with a garden trowel or scoop shovel and lift the root system from the ground. Put the root system and attached vines in the stack.

Spread out the vines on the ground and spray with an herbicide containing the active ingredient glyphosate, in accordance with manufacturer’s instructions. Even though the vines will die from dehydration, herbicide accelerates the procedure.

Grapevines

Cut the grapevines 1 foot from the ground with bypass pruners or lopping shears. Allow three to six months to your stumps to create leaves.

Spray the stumps and leaves with an herbicide that has glyphosate as its active component, according to the manufacturer’s minimum labelled speed of program. Allow two weeks to the herbicide to take effect.

Pull the hanging stumps out when they decay and die and discard them.

Briars

Dig around the base of the briar plants with a scoop shovel. Using the shovel for a lever, reach under the root ball and then lift up to dislodge it from the ground.

Grasp the briar plant near the base and remove it from the ground. Put the briar plant in a receptacle and carry it into your disposal area. Although cutting edge briars kills them fully, check with the community municipality for guidelines concerning open flames.

Apply herbicide featuring with glyphosate as its active component in accordance with the manufacturer’s education to the place you removed the briar patch from.

See related

What Is the Garden Gourmet Backyard Composter?

The Garden Gourmet Backyard Composter is a self centered composting system which makes it much easier to recycle your garden and kitchen waste. It features the home gardener some advantages over loose composting and above homemade composting bins. One such advantage is size. The Garden Gourmet is very compact, so it lets those with very limited yard space take advantage of composting. It also maintains the compost neatly contained and out of sight.

Basic Physical Description

The Garden Gourmet Backyard Composter bin is just a black plastic container which can hold 11 cubic feet of compost or even scraps. It’s 36 inches high and 24 inches square. It has adjustable air vents on the sides and a hinged lid on top that snaps securely in place to keep compost in and inquisitive pests like raccoons and opossums out. The empty container weighs 29 pounds and arrives unassembled, but it is easily put together without the need for some tools. Those that like recycling will appreciate this bin is constructed from about 51 percent recycled products.

Rodent Protection

One important feature to note about the Garden Gourmet bin is it is available at the bottom to permit liquids to escape. This usually means your compost sits right on the ground. While this might not be a issue, it’s also possible that mice, rats and other sorts of rodents may find their way into your bin. To keep them out, place a display under the composter before you fill it up. This will allow liquids to drain out and prevent rodents from getting in.

Using the Composter

The Garden Gourmet composter is a very simple system. All you want to do would be to open the lid, then toss your scraps in, close the lid and wait, but you should be aware it can take up to two years to complete the composting process. Should you use a shovel or a spade to turn the compost inside the container you can cut that down to as small as three months. Composting also works great if you include a mix of substances, like leaves, grass clippings and kitchen scraps, and chop or shred things before placing them at the composter.

Harvesting Your Compost

When your compost is ready it will be brown and have the look and feel of rich garden soil. The Garden Gourmet is intended to enable you to leave the upper layers of compost hovering while you crop the finished merchandise. It has a door in the bottom that opens, enabling you to scoop out the finished compost and then leave the rest to drop down and fill in where the finished compost was. Once you have eliminated the compost, close and latch the door and the composting process will last for everything which remains in the bin.

See related

A 1920s Grill Inspires a Patinated Patio

This new terrace next to a property’s carriage home is filled with exceptional personality; features include a classic stone grill, a custom made trellis and a dining table crafted by a salvaged balcony railing. Starting from a blank slate, landscape designer Susan Cohan made an inviting, bright terrace that only calls out for enjoying a cold drink, a chat and also a full summer meal. Here’s a closer look at the way she’s pulled it all together.

Susan Cohan, APLD

When Cohan arrived on the scene, there was nothing here but the 1920s wood-burning granite grill, which was in such disrepair that a tree had grown through it. A big believer in reclaiming and reusing, Cohan had the uncommon piece completely cleaned out as well as refurbished. The doors are covered in a metal paint which matches that of their new trellis, and she added an additional salvaged bit, a classic radiator grateinto a hole situated up the center of this chimney.

Susan Cohan, APLD

A iron balcony railing in a local salvage yard became the foundation for an outdoor serving table. “I really like to discover an architectural attribute and use it the following way,” Cohan says. “Using something like iron is a way to add patina to a job that may be brand new; it provides it some warmth and history you can’t just locate in new materials.” The tabletop is a custom-cut slab of bluestone. It now acts as a spot for a buffet or bar, and may also serve as a potting bench.

Cohan had the artisans in Recycling the Past build it out, adding new legs to the railing to balance and support the heavy top. The dining table base, for instance, new legs, and labour was $400. The custom-cut bluestone top was 200.

Susan Cohan, APLD

Hayrack window planters draw the eye upward from the terrace. “The colour up there will help tie the space together; people frequently neglect to utilize vertical space in the backyard,” Cohan says.

Patio furniture: Lloyd Flanders

Susan Cohan, APLD

The terrace is about 10 inches off the ground on this side. Hypertufa baskets comprising sempervirens, sedums and thyme sit atop a new Pennsylvania fieldstone wall.

The terrace is full-range bluestone in an ashlar pattern using a thermal end. Cohan was also able to incorporate some bluestone flagstone found onsite; if you squint you may spot the pieces surrounding the grill.

Susan Cohan, APLD

Susan Cohan, APLD

Cohan fit a circle inside the square of their terrace to gain some garden space immediately around the terrace. A crabapple tree offers spring blooms; a low-growing boxwood, Buxus microphylla‘Franklin’s gem’, grows beneath it.

A cedar trellis by Scott A. Patkochis provides a feeling of enclosure around two sides of the terrace. The open side faces the remainder of the farm meadows and the main home.

Lattice opaque stain: Yorktowne Green, Benjamin Moore

Susan Cohan, APLD

The curved border gave her the chance to fit in more gardens from the corner of the trellis. Sedum, dianthus and iris add colour and texture, while more of this low-growing boxwood lends a constant feel from 1 side of the terrace to another.

Traditional grey Belgian block strengthens the edge just marginally above patio grade.

Susan Cohan, APLD

Espaliered apple trees develop the trellis.

More ways to operate with salvage finds

See related

8 Gorgeous Trees for Winter Interest in the Garden

Winter is often thought of as the good time of year to escape the harsh elements and head inside to get comfy. Most plants are dormant, and the backyard is a far more subdued place than at the spring and summertime, when there’s all that vibrant and budding colour. But don’t discount your backyard at the off season. It is within this sedate atmosphere that tree form and structure take center stage, and a whole new level of attention can be gained.

Evergreen trees would be the obvious stars of winter landscape because they supply structure year round, but a lot of deciduous choices have interesting bark along with a gorgeous branch form.

When planning a website for your winter-interest tree, then think of an area of your backyard where the surrounding plantings are mostly herbaceous so that your characteristic tree can show its true colors and is not blocked by foliage.

Here are some of my favourite winter trees.

The New York Botanical Garden

Stewartia Pseudocamellia

Peeling bark carries several distinct forms, also Stewartia has one of the unique appearances. As old bark flakes off, a gray, brown and light reddish patchwork effect appears on the trunk of this tree, creating an intriguing contrast to snowy landscapes.

USDA zones: 5 to 9 (find your zone)
Soil condition: Prefers acidic soil
Light requirement: Best in partial shade; will withstand full sun with ample water
Size: Slow growing, to 30 to 40 feet

Matt Kilburn

Paperbark Maple
(Acer griseum)

The paperbark maple is another tree with intriguing peeling bark. This slow-growing tree is ideal for small gardens and can be an intriguing focus in winter landscape due to its rich colour and the tactile surface of its trunk.

USDA zones: 4 to 8
Soil requirement: All types provided that the soil is well drained
Light requirement: Full sun to partial shade
Size: Slow growing, to 20 to 25 feet

Matt Kilburn

Monkey Puzzle
(Araucaria araucana)

Speaking of focal points within a backyard, a Monkey Puzzle tree can add unique texture to the landscape. The whimsical type of this tree will probably stand in sharp contrast (literally, due to the razor-sharp, scale-like leaves) into the snowy landscape, giving an exotic respite in the dog days of winter.

USDA zones: 7B into 10B
Soil requirement: Prefers well-drained acidic soil
Light requirement: Total sun
Size: Slow growing, to 30 to 40 feet

The New York Botanical Garden

Tibetan Cherry
(Prunus serrula)

The Tibetan Cherry is an intriguing tree year round due to its glistening, silk-like bark. The wealthy coppery-red, smooth surface of the trunk comes to life from the winter garden as other colors fade. Its ease of expansion makes it a great choice for beginner anglers.

USDA zones: 7 to 10
Soil requirement: All types provided that the soil is well drained
Light requirement: Total sun
Size: Slow growing, to 20 to 30 feet

Matt Kilburn

Japanese Maples
(Acer palmatum spp)

Japanese Maples are a great addition to any backyard due to the seemingly endless forms offered in various colors and dimensions. Several have an amazing trunk and branch form which can be viewed when all the leaves are all gone. I often enjoy these trees in winter because of their gnarly, contorted branches have so much character.

USDA zones: Varies, but generally between 6 to 9
Soil demand: All types provided that the soil is well drained
Light requirement: Varies, but generally full sunlight to partial shade
Size: Varies, but generally slow to moderate growth, to 15 to 20 feet

Photo from Scott Cutler; used with permission

Matt Kilburn

Strawberry Tree
(Arbutus unedo)

Strawberry tree is an excellent addition to sunny sites that flowers in the late autumn and then produces bright red, round fruit throughout the winter months. The fruits are actually edible (although they’re an acquired taste!) And are great for holiday wreaths and bouquets. This evergreen specimen is classified as a tree but over the years can be pruned to a small tree form.

USDA zones: 6 to 9
Soil requirement: All soil types
Light requirement: Full sun to partial shade
Size: Slow growing, to 20 to 25 feet

Matt Kilburn

Colorado Blue Spruce
(Picea pungens)

The Colorado Blue Spruce is a popular addition to a lot of landscapes due to its vibrant gray-blue needles. This stately evergreen provides vertical structure to the garden year round but really stands out against a backdrop of snow and ice.

USDA zones: two to 7
Soil requirement: All soil types
Light requirement: Total sun
Size: Slow to moderate growth, to 40 to 50 feet

Matt Kilburn

Himalayan Pine
(Pinus wallichiana)

Many pine tree varieties create amazing flashes that add architectural interest to the landscape. This species is a walnut, a gorgeous tree known for the long needles and large, storybook-perfect cones.

USDA zones: 5 to 7
Soil requirement: All types provided that the soil is well drained
Light requirement: Full sun to partial shade
Size: Slow to medium growth, to 30 to 50 feet

See related

9 Low-Growing Hedges That

When we think of low-growing hedges, we’re most likely to think of boxwood (box) hedging, Buxus spp, utilized in knot gardens and also to advantage herb gardens and herbaceous borders. But now there are different sorts of non hedges — such as “step over” hedges. Step-over hedges are reduced hedges, generally under 2 feet, created by restricting the growth of larger shrubs through pruning.

This tendency could be seen in fresh British housing estates, where the usage of step-over hedges generates a milder visual barrier between properties while mixing in with multiple landscape schemes. These low hedges could mark the border of your house without losing much space or reducing light the way traditional hedging can. This low hedging can also be utilized as a characteristic in other plantings or as a characteristic against fencing or walls. It can give a sculptural sense better compared to tall, naturalistic hedging we are utilized to.

Many shrubs are suitable, but for optimal step-over hedging, they should be:
EvergreenSlow growing and tolerant of trimmingHappy to be implanted alongside additional shrubsDisease resistantI believe you can see in the subsequent examples just how appealing and effective these hedges can be.

Troy Rhone Garden Design

Boxwood or Box
(Buxus spp)

Boxwood hedging has ever been the traditional plant used in dwarf hedging, and though it has its own drawbacks, it’s still the best general-purpose plant for this type of hedging.

Boxwood can be more prone to the fungal infection Cylindrocladium buxicola, or box blight. This is prevalent in the U.K. and dispersing in the U.S.

USDA zones: 5 to 9 (find your zone)
Water requirement: Drought resistant; necessitates well-drained soil
Light demand: Prefers partial or full shade; can be scorched by sun
Mature size: 18 to 36 inches tall
Planting tips: Plant in well-drained soil. Boxwood benefits from an application of fertilizer and a mulch after clipping in spring.

Good alternatives to box are Japanese holly (Ilex crenata) and box honeysuckle (Lonicera nitida).

Cherry Laurel
(Prunus laurocerasus)

Common laurel is just another tamable low hedging plant. It’s an evergreen shrub that could quickly grow to 20 feet tall and wide. But here you can see how it has been controlled by judicious clipping and has formed a superb low formal hedge.

USDA zones: 6 to 9
Water demand: Drought resistant
Light demand: Sun or semi shade
Mature size: 25 to 30 feet tall
Planting tips: Requires feeding in poorer soils, where the leaves can become chlorotic
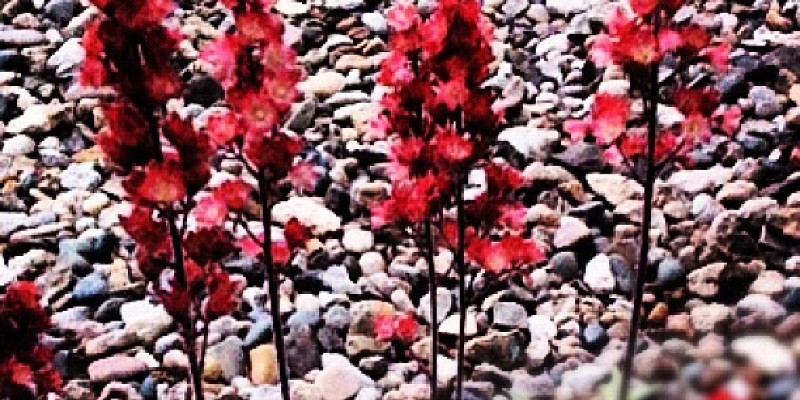
Laurustinus
(Viburnum tinus ‘Eve Price’)

Laurustinus is just another big, bushy evergreen which you wouldn’t believe could be controlled enough to make a step-over hedge

Here the variety ‘Eve Price’ generates a stunning dwarf hedge, since it’s more compact than some of the other varieties of Viburnum tinus. The blossoms, blooming in late autumn to early spring, are very appealing, with carmine buds and pink-tinged petals.

The hedge shown here is cleverly underplanted with glowing pink geraniums, which contrast beautifully against the lush summer foliage of the Viburnum.

USDA zones: 7 to 10
Water demand: Drought resistant
Light demand: Full sun to full shade
Mature size: 8 to 10 feet tall
Planting tips: Grows well in moderately fertile and humus-rich soil, but soil needs to be well drained

JMS Design Associates

Lavender
(Lavandula stoechas)

Spanish lavender, also called French lavender in the United Kindgom, has odd blackish-purple flowers surmounted by a tuft of purple bracts.

For dry, sunny spots, lavender may create a fantastic low hedge. Though it can be short lived, it is still the best of the low-growing aromatic shrubs.

USDA zones: 6 to 9
Water demand: Low; gains from additional watering
Light demand: Full sun
Mature size: 18 to 36 inches tall
Planting tips: Prefers well-drained soil in full sun; if grown in containers, it is going to require frost protection.

A fantastic alternate to lavender is rosemary — that also adores a hot, sunny spot. Perhaps the best variety to use for non hedging is the compact Rosmarinus officinalis ‘Severn Sea’, that has citrus leaves and vibrant blue flowers in the summer.

Hebe
(Hebe x andersonii)

Hebes, primarily from New Zealand originally, differ widely in height, leaf size and flower color. Some of the lower-growing varieties make superb step-over hedges.

I was always taught, “The bigger the foliage on Hebes, the hardier the variety.” While I’m not sure whether that is true, it has ever worked for me.

Hebe x andersonii is a vigorous grower, but with careful pruning it makes a low hedge that provides a summer of gentle lavender-blue flowers fading to white in fall.

USDA zones: 9 to 10
Water requirement: Moderate
Light demand: Full sun or semi shade
Mature size: 6 to 8 ft tall
Planting tips: Grows best in moist but well-drained soil.

Elaeagnus
(Elaeagnus x ebbingei)

Elaeagnus x ebbingei has lovely dark green leaves with silvery-pewter undersides and little fragrant flowers.

Even a few of the open-growing shrubs can be formed into appealing low evergreen obstacles. Evergreens such as Elaeagnus must be pruned in spring just before growth starts.

USDA zones: 7 to 11
Water demand: Drought resistant
Light demand: Full sun or semi shade
Mature size: 9 to 12 feet tall
Planting tips: Grow into well-drained dirt; good for exposed and coastal situations

Box Honeysuckle
(Lonicera nitida ‘Baggesen’s Gold’)

Box honeysuckle is a small-leaf evergreen that is perfect for clipping. It is very good for hedging, as it is quick to regrow — although it is going to attain a height of 7 to 8 ft if not included.

Lonicera nitida ‘Baggesen’s Gold’, shown here, has the extra benefit of bright yellow foliage in summer which turns out a yellow-green in autumn.

USDA zones: 6 to 9
Water requirement: Drought resistant
Light demand: Full sun to partial shade
Mature size: 7 to 2 ft tall
Planting tips: Prefers well-drained soil. Its glowing yellow foliage can become greenish-yellow in colour.

Daisy Bush
(Brachyglottis greyi)

For a gorgeous gray hedge that is pretty hardy, it’s a challenge to beat Brachyglottis greyi. The plant is sometimes marketed as Senecio greyi or Senecio ‘Sunshine’.

One thing which you will almost certainly miss with judicious pruning would be that the glowing yellowish daisy-like flowers that cover the plant in the summer. This hedge will have to be pruned at least twice a year to keep it in shape.

USDA zones: 8 to 10
Water demand: Low
Light demand: Full sun or semi shade
Mature size: 3 to 5 ft tall
Planting tips: Grow it into well-drained soil, rather than full sun.

Mountain Holly
(Olearia ilicifolia)

Mountain holly is just another massive evergreen shrub from New Zealand. It could reach 6 feet in height, however once more, with timely pruning spring it could be restricted to develop into a step-over hedge.

The gray-green leaves are narrow and spear formed, with undulating and toothed edges which make it ideal for deterring dogs from entering your garden. If unpruned it will flower in spring with fragrant white blossoms.

USDA zones: 8 to 10
Water requirement: Minimum, particularly in winter
Light demand: Full sun
Mature size: 6 ft tall
Planting tips: Grow it in a fertile, well-drained soil in full sun and shelter it from chilly winds.

See related

Copyright h o m e s t a y b e i j i n g 2 0 0 8 2024